How To: Make an AC Arc Welder Using Parts from an Old Microwave, Part 1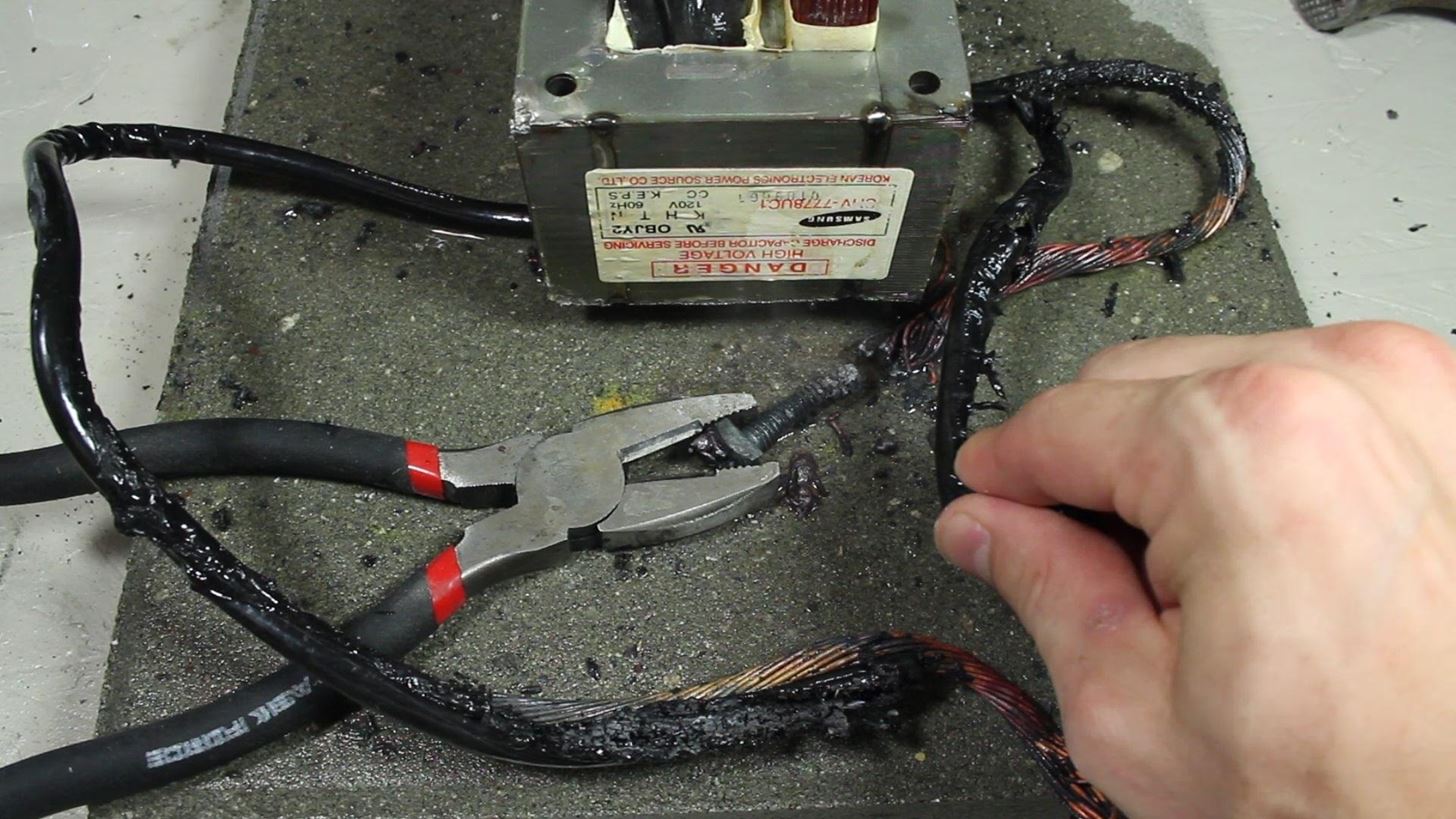
In a previous article, I demonstrated an Arc Welder made using parts from old microwave ovens. Please enable JavaScript to watch this video.
Here is part 1 of 2 on how that arc welding machine was made, and how you could make one too! This is the first of two parts on building it, focusing on the modification of the transformers. Please enable JavaScript to watch this video.
WARNING: Stick welding, and/or the modification of a Microwave Oven Transformer (M.O.T), can be very dangerous and presents risks of UV radiation, shock hazards, burns, fires, fumes and a multitude of other risks. This project should not be attempted without a thorough understanding of electricity, adult supervision and adequate training. Misuse, or careless use, of tools or projects may result in serious injury and/or death. Use of this content is at your own risk. In a previous project, I melted the lead wires on my first metal melter. But the transformer core was still in great condition, so I re-used it to make an AC stick welder!The arc welder made sparks fly, but in the end, it wasn't enough power to make the metal stick, and the pieces of work would break apart with very little effort.If I tried pumping more power into the welder, the wires would overheat and melt.So to address this challenge, we'll be using 2 MOTs (Microwave Oven Transformers), because more transformers means more power! Preparing the MOTs for a new secondary is exactly the same as the first few steps we took in the Metal Melter project. As it's a little redundant, I won't spend much time on the step-by-step instructions for that, but if you haven't seen it yet, you can check out the video, or reference my previous article. To make life a lot easier, you're going to need to build a little jig for winding your secondary. It's unlikely you'll get all the required turns of wire in such a tight space without one.To make this jig, I used a piece of scrap wood and cut it so that it was as wide as the center of the transformer, and just a little shorter than the top. The length was cut so that it overhung about 1/2" from the ends.I screwed wood panels on the top and bottom to guide the wires and keep them in place, then folded a piece of paper so that it fit in the groove.Once mounted in a bench vice for leverage, the cable can be wound on.For this project, try to round up around 50'of 8 AWG stranded copper cable from a local hardware store. You could probably save some money by scavenging for free wire, but I decided to look at the "end of coil" section at the hardware store, and was able to negotiate a deal for half price on the cable, so the 50' only cost me about $17.These modified MOTs will need a new secondary that is 18 turns of the 8 AWG cable, and both MOTs will be tied together in series. I also found I needed to run the system on 240 volts AC to get the power output for good welding. My goal was 30+ volts AC with a variable amperage from 0-120+ Amps.In practical terms, this means you need to wind the coil on the form so that you end up with 6 cable lengths high, and 3 cable lengths wide. Oh yeah, and it all needs to be able to fit back in the transformer, so wind it tight!The first layer isn't too bad, but winding the second layer, and third get progressively more difficult, and may seem near impossible.Once you get the 18 turns of wire to fit in the groove, you can fold the paper over, and tape it together to help the coil hold together.Here's the tricky part .. get it off the jig without letting it unravel!The top and bottom panels can be removed, and the block pushed out from the center of the coil. I used electrical tape to make sure the coils stayed tight. Putting the secondary coil in the transformer is a very tight fit.I had the best success by using a set of clamps to squeeze the sides of the coil in, while I used a rubber hammer to gently tap the coil down.When it's in, the coil had better fit below the top edge of the transformer, otherwise you won't be able to get the top back on.Securing the top on is the same as in the Metal Melter project as well. Basically, use 2 part epoxy glue to cover the entire top surface, then replace the iron lid and press it together tightly in clamps or a large vice.It's extremely important to have a lot of pressure on the joint while the epoxy is setting. I let mine set for about 24 hours.The modified transformer is complete! The secondary coil is so tight in there, that any vibrations from the 60Hz mains power will be kept to a minimum. When both transformers are modified in the exact same way, we've basically got what we need for welding. All that's left is to clean it up a bit and make it more useful and presentable. By the way, these two exposed wires from the secondaries will become our ground clip and stinger.Well, there they are! The basic makings of an AC stick welder. From this point, it isn't difficult to finish the system up into a nice little hobby welder. Watch how to do that in Part 2. Please enable JavaScript to watch this video.
If you haven't see the video yet, it's not too late. Watch it here!If you like this project perhaps you'll like some of my others. Check them out at thekingofrandom.com.
Watch more JoshB
How to Turn a flashlight into a laser « Hacks, Mods
The slots allow you to position the electric motor at slightly different distances from the stationary gasoline engine, which allows you to tighten or loosen the tension on the fan belt between the two. Position the electric motor so the fan belt feels tight and then secure the motor in place with four 1 1/2-inch bolts with lock washers and nuts.
How Do Electric Fans Work? | Reference.com
On the iPhone, to show the percentage of battery left, I can go into Settings > General > Usage and toggle "Battery Percentage" on. My daughter's iPod touch doesn't have a Usage category.
20 Ways to Improve Battery Life on Your iPod touch - Lifewire
Update: If you're running iOS 7 or higher, you'll want to check out the new way to fully close your background applications. With this new feature, some might be confused on how to actually shut down their running apps, instead of leaving them on in the background. If you're confused as to how to
Quitting All Your Apps in iOS Can Actually Worsen Battery Life
If your power button is not working properly, then don't worry. There are plenty of ways to restart Android without power button. In this guide, we will provide five different ways to teach you how to restart Android phone without Power button. Let's get it started with! Part 1: Restart Android without power button (when phone is still off)
How to Shut Down an iPhone or iPad Without Using the Power Button
osxdaily.com/2017/10/08/shut-down-iphone-ipad-without-power-button/
The latest versions of iOS offer a nice software feature that allows users to easily shut down an iPhone or iPad entirely through system menu options, without having to use the power button or any other physical buttons on the device at all.
At the time of the iOS 4 announcement, Steve Jobs mentioned that some features such as Multitasking and Wallpaper are not going to work on the iPhone 3G. This is most probably because of memory and CPU issues (the iPhone 4 has 512Mb, the iPhone 3Gs has a faster CPU than the 3G).
Multitasking and homescreen wallpaper on iPod touch 2g
How To: Disable the 'Good Morning' Message on Your iPhone's Lock Screen How To: Remove Widgets from Your iPhone's Lock Screen How To: Get the Most Out of iOS 11's New Lock Screen-Style Notification Center How To: Access Your Screen Time Usage Stats Faster in iOS 12 for iPhone
iOS Basics: How to Add Widgets to Your iPhone's Lock Screen
How to: Wireless Tether a Motorola XOOM to a DROID X Root your XOOM. Download Wireless Tether from the market and install it on your DROID X. 5. Open Wireless Tether and tap the green WiFi
News: There's a Simple Solution to Getting Older iPhones Running Fast Again News: Moto's New Phones Are Fast Charging, Shatterproof, & Modular—But Are Missing One Big Thing How To: Fix Dead Lithium-Ion Batteries That Won't Hold a Charge Anymore How To: Make a Survival Light Source How To: Keep Your Smartphone Charged During a Power Outage
How to Change or Replace the Battery on a Electric Razor
Swype is already the fastest way to type on a mobile phone and in this tutorial you will learn how to practice so that you get even faster. Once you get the hang of it, you will be Swyping like crazy. Try these little exercises and work out your fingers so that you can beat the world record for text
How to Capitalize your letters when texting with Swype
Learn how you can re-order or re-arrange the notification panel shortcuts so that you can quickly access to the most useful functions on the Samsung Galaxy S4. "samsung galaxy" galaxy samsung s iv
Use the Notifications Panel on Samsung Galaxy S5 - VisiHow
0 komentar:
Posting Komentar