How To: 33 Cool Little Android Features You Might Not Know About
One of Android's biggest strengths is its flexibility. There's usually more than one way to perform the same task, which makes it easy to find an alternate method that works better for you. Android also has some hidden features that newer users might not be aware of, so we made this list to highlight lesser-known tips and tricks.These are all simple ways to improve your experience. None of our tips require downloading any third-party apps. We focused on the operating system and the apps included when you first turn on your phone. This way, most of our tips will work on all phones despite differences in OEM skins. We focused on Android 7.0 Nougat and newer, but some tips will work on older versions of Android, too.
1. Trigger Split Screen with One ButtonWhen you have an app open and at least one more that you've opened recently, you can activate split-screen mode by long-pressing the Recent Apps button. This button is usually square shaped, and it resides directly to the right of your home button (except on Samsung phones).The opened app will be pinned to the top half of the screen (if you're in portrait mode), and you can select from the list of background apps (if you have more than one) to pin a second app to the bottom half of your screen. To learn more about how split screen works in general, check out this guide:Don't Miss: Everything You Need to Know About Nougat's Multitasking Features Note: This feature requires Android 7.0 or higher.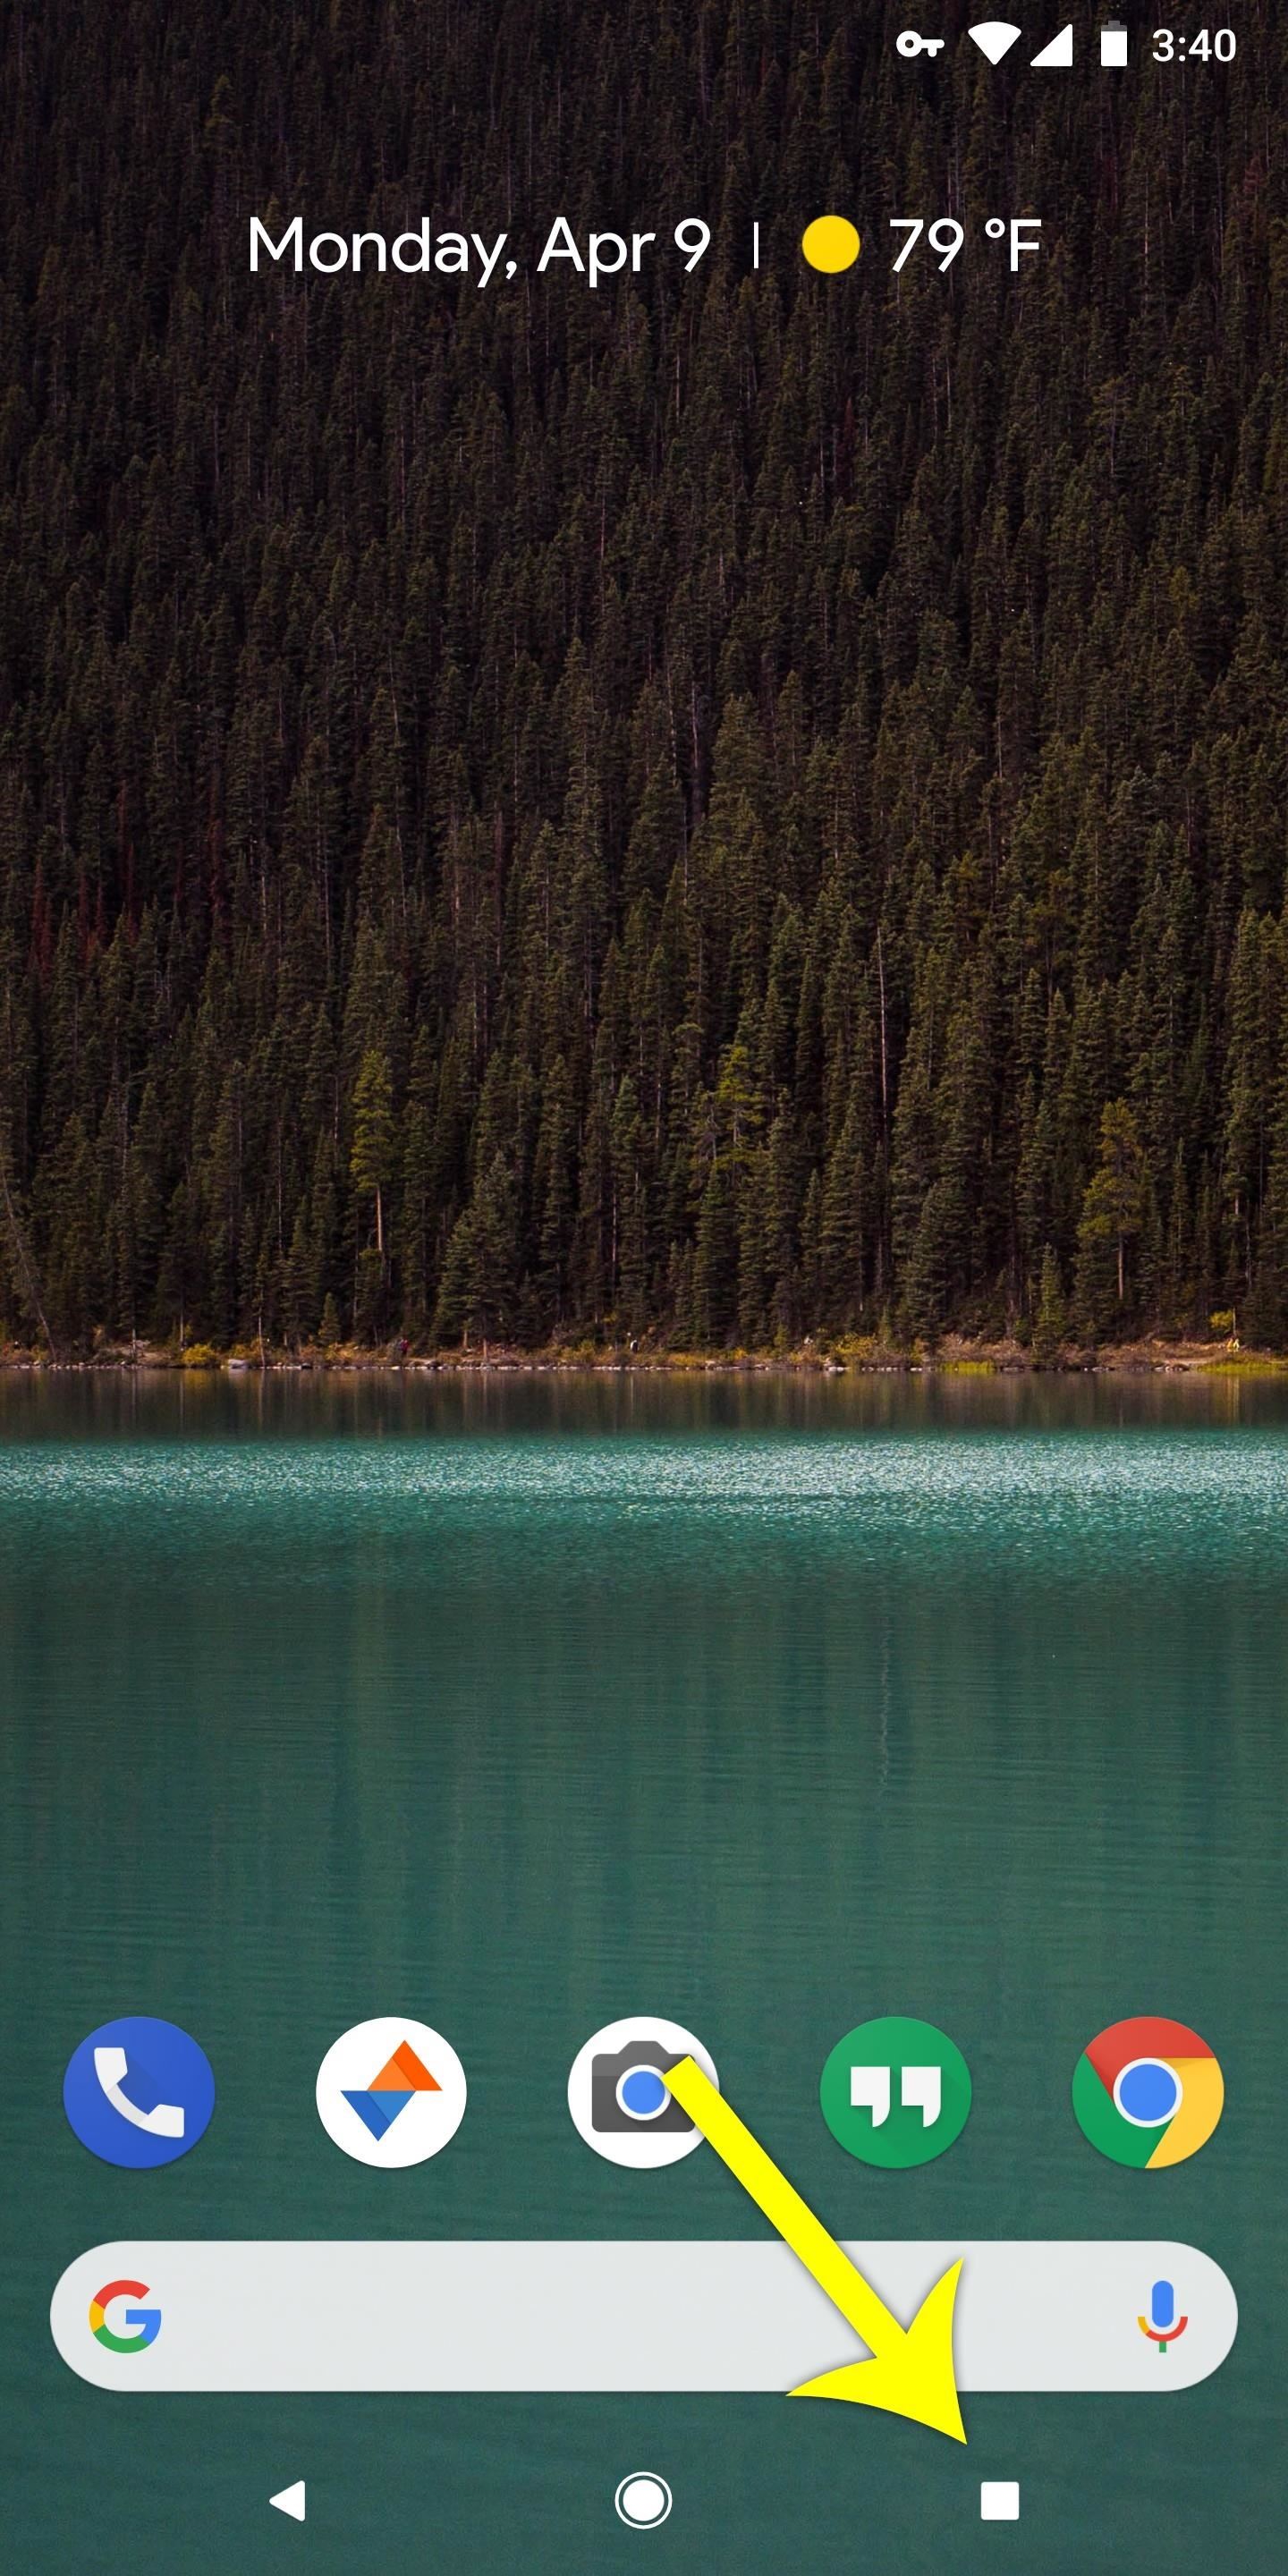
2. Double Tap the Square Button to Switch to the Previous AppKeeping with the theme of multitasking, there's another neat gesture that little square Recent Apps button can do. Instead of tapping it once, then selecting the previous app you were using, you can simply double-tap this button to quickly switch over to the last app you were using. Note: This feature requires Android 7.0 or higher.
3. Open the Side Menu with a SwipeMany people are familiar with the "hamburger menu" (the three horizontal lines in the top-left corner of many apps), but what you may not know is there's an easier way to access it. Instead of stretching your hand all the way up to tap that button at the top of your display, just swipe in from the left edge of your screen to access the same menu.
4. Lock Apps in the ForegroundIf you let your kids use your phone occasionally, there's a great feature that will prevent them from accidentally wandering outside of the app you want to let them use. It's called "Screen Pinning," and it can be activated in Settings under "Security."Once enabled, open the app you want to lock into place, then press the multitasking button (square button on your navigation bar). From there, scroll up to where you can see the bottom of the app's card in the multitasking view. You'll find a little pin icon here — press it, then you won't be able to leave this app until you press the back and recent apps buttons simultaneously, then enter your PIN or scan your fingerprint.
5. Capitalize the First Letter of a WordIf you forgot to capitalize a word, Gboard has a quick fix. Double tap the word to highlight it, then tap the uppercase key on the keyboard to capitalize the first letter.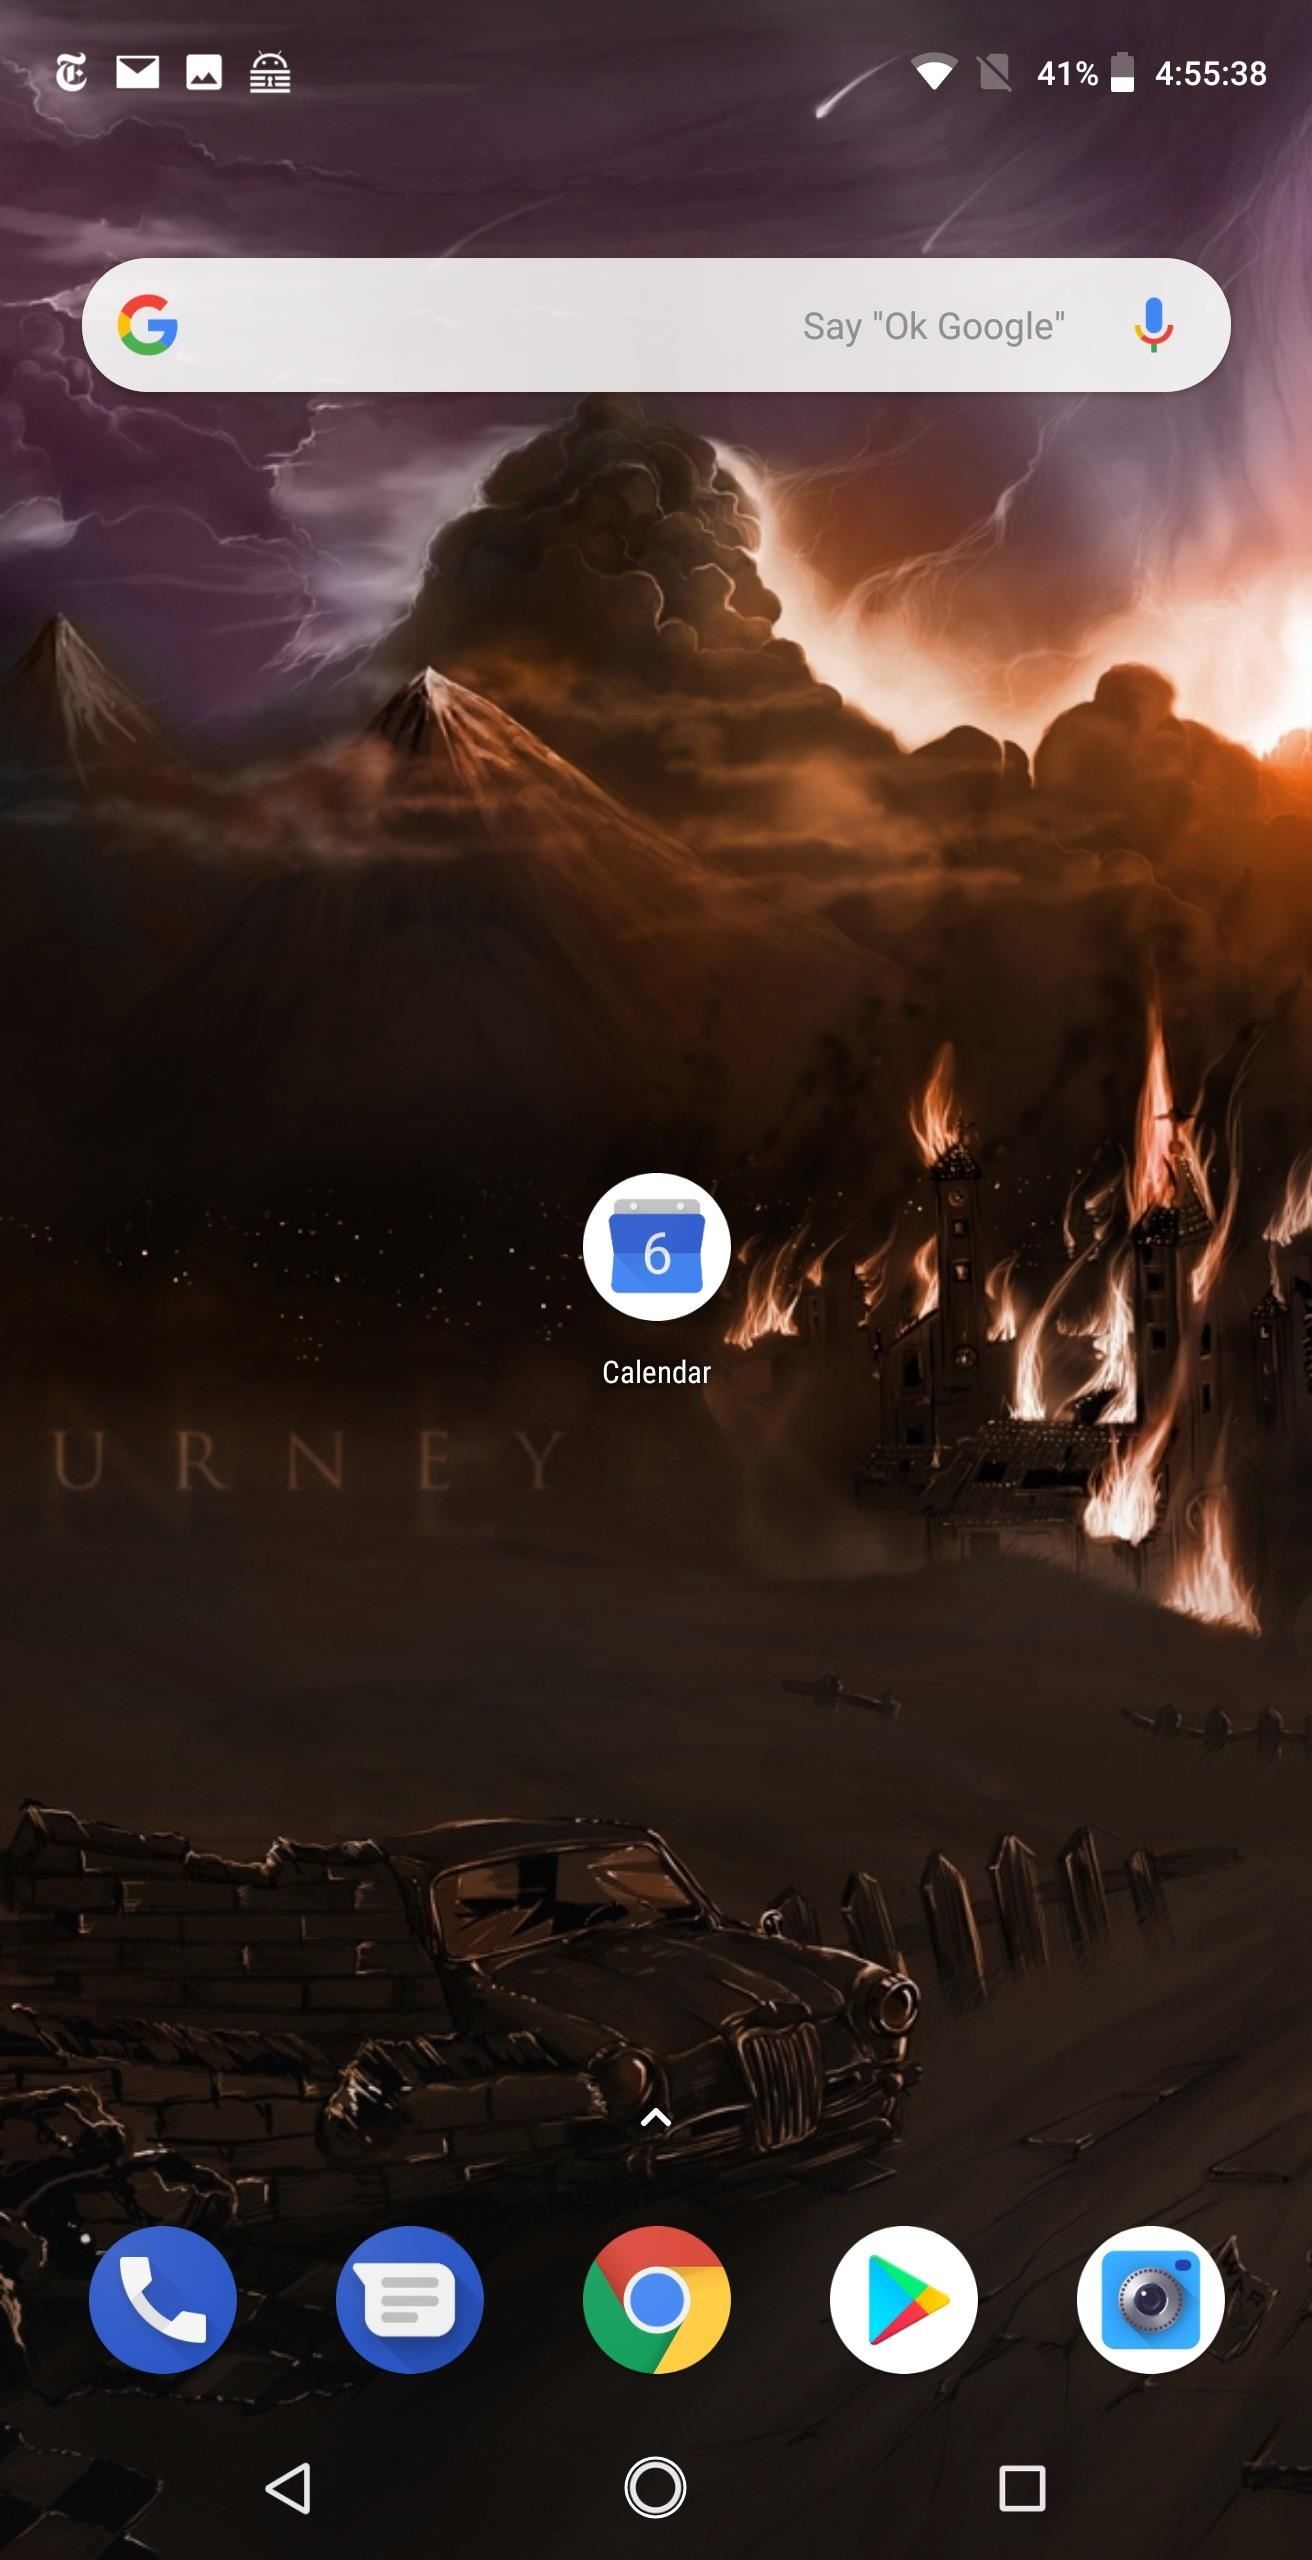
6. Check the Time & Date FasterIf you pay close attention to the Clock app, you'll notice that its home screen icon displays the current time. The same goes for the Calendar app, whose icon will display the current day. Note that some custom launchers like Nova do not support this feature (though Action does). Additionally, it won't work if you're using a custom icon pack.Note: This feature requires Android 7.0 or higher.
7. One Swipe for Quick SettingsNormally, you have to swipe down twice from the top of the screen to reveal the entire Quick Settings menu. However, if you swipe down on the status bar with two fingers, you can jump right into the full Quick Settings view for bigger toggles and a few extra controls.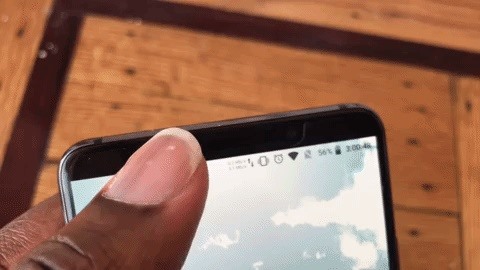
8. Double Tap the Status Bar to Reveal NotificationsIf you just want to check your notifications, you don't have to swipe down from the top of your screen. Instead, just double tap the status bar at the top of any screen and your notification panel will automatically expand.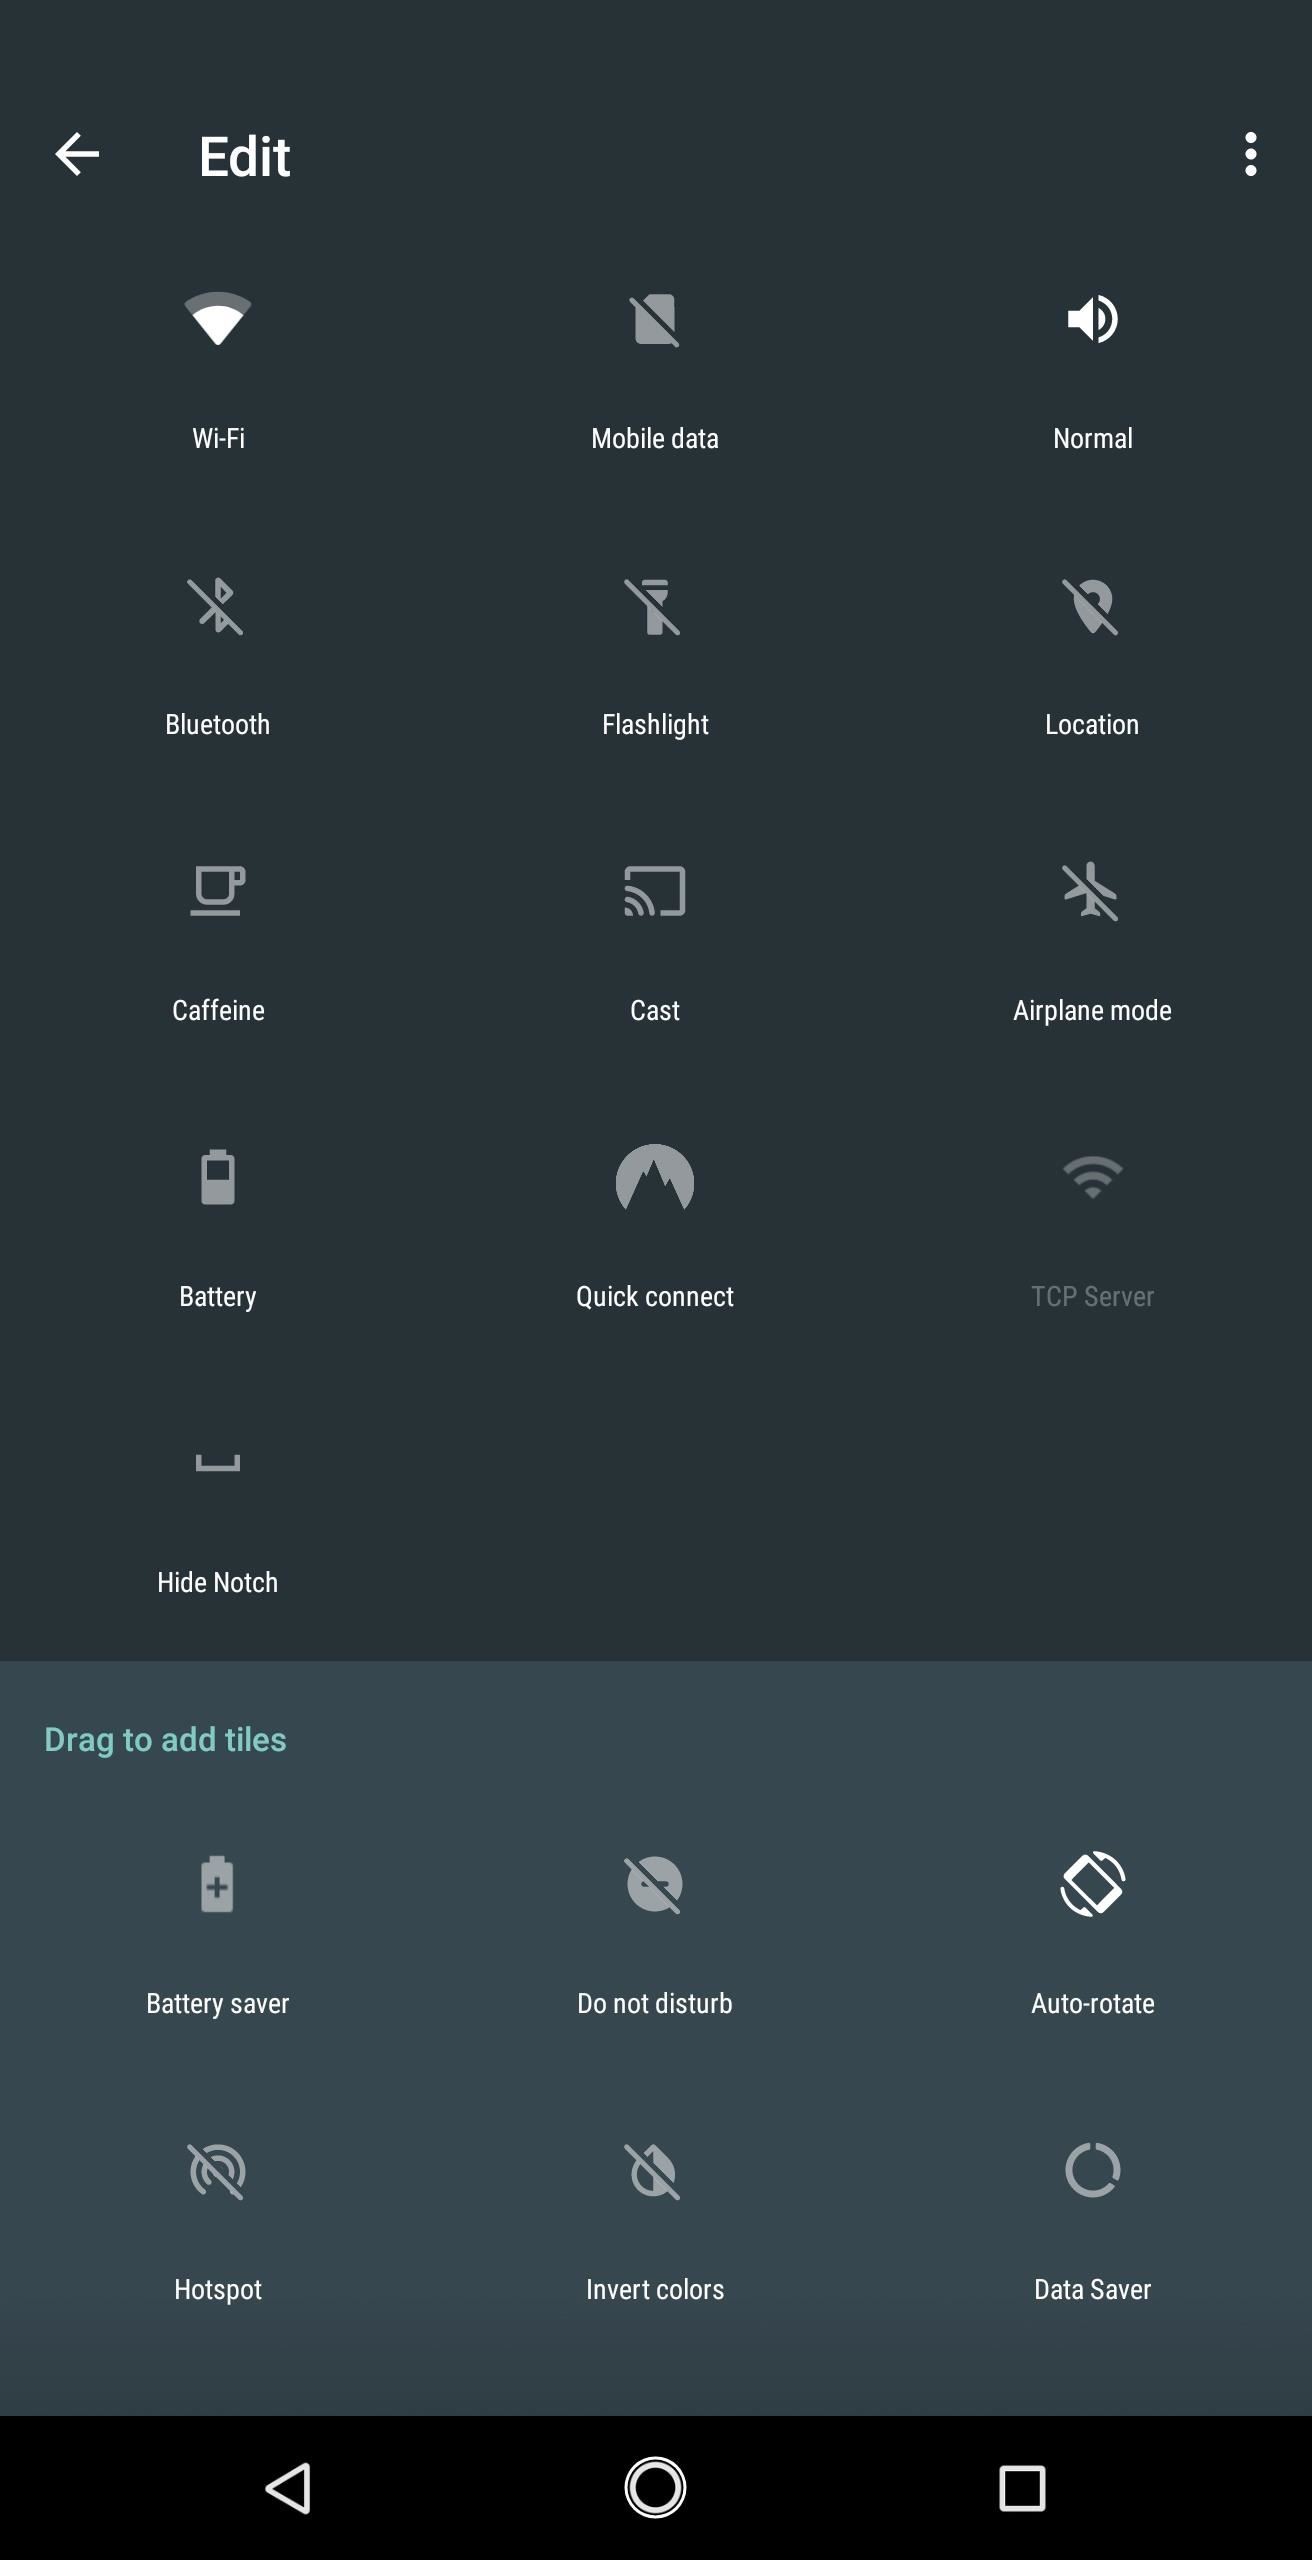
9. Rearrange Quick Settings Tiles & Add New OnesThe Quick Settings menu has an "Edit Mode" which lets you rearrange the toggles in this all-important menu. To try it, you need to reveal the full Quick Settings menu (try using the previous tip), then select the pencil icon (or "EDIT" button) along the bottom of the Quick Settings menu.As mentioned, this lets you rearrange the existing Quick Settings toggles, add new ones, or remove existing ones. The apps you install can also create their own custom Quick Settings tiles that you can add here. To learn more about how this whole system works, check out our full guide on the topic:Don't Miss: How to Add Your Own Quick Settings Tiles in Android 7.0 or Higher Note: This feature requires Android 7.0 or higher.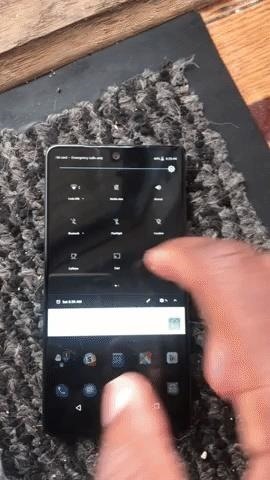
10. Long-Press a Quick Setting Tile to Open the Full MenuIf you simply tap one of your Quick Settings tiles, it will toggle that feature on or off. Some tiles offer another way to interact with them — long-press the tile, then you'll jump straight to the relevant menu in Settings.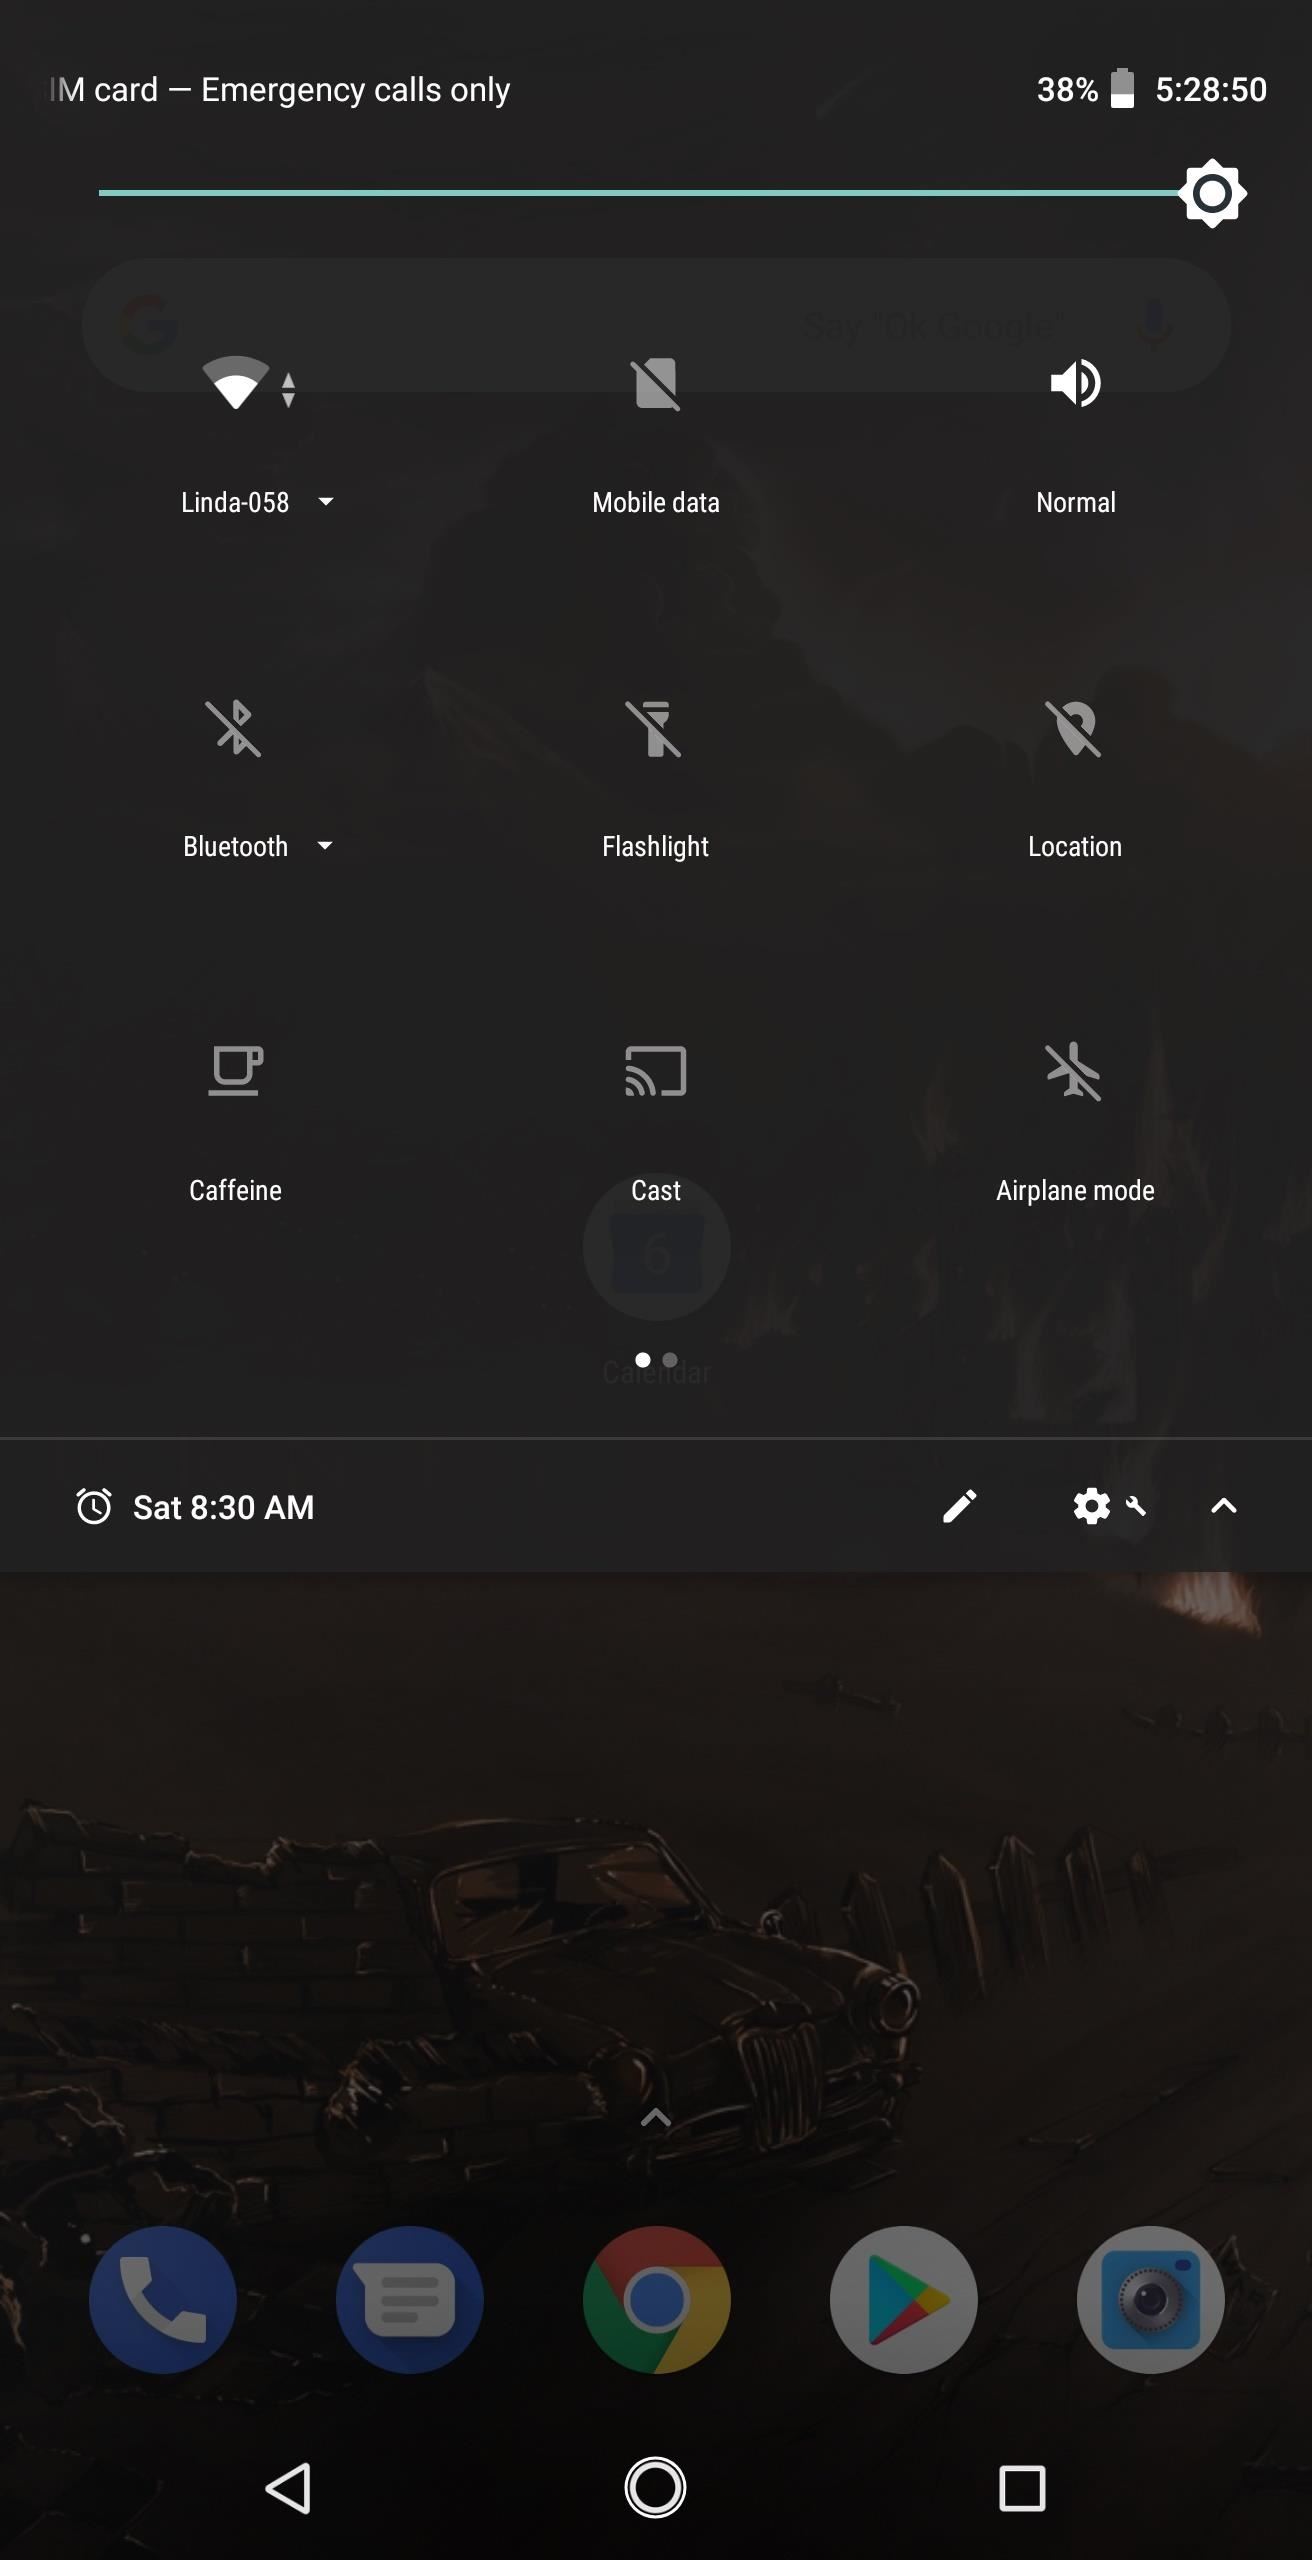
11. Open the Clock App by Tapping Your Next AlarmIf you have an alarm set on your phone, you'll see an alarm icon with the date and time in your Quick Settings menu. Simply tap this portion of your Quick Settings menu to open the Clock app from any screen.
12. Show Hours, Minutes & SecondsThere's a hidden menu in Android that lets you modify the status bar, and you can use it to make your status bar clock show hours, minutes, and seconds. Follow our guide at the link below to unlock the secret option. Once unlocked, tap the "Status bar" option and choose "Time," then select "Show hours, minutes, and seconds."Don't Miss: How to Enable Android's Hidden System UI Tuner Menu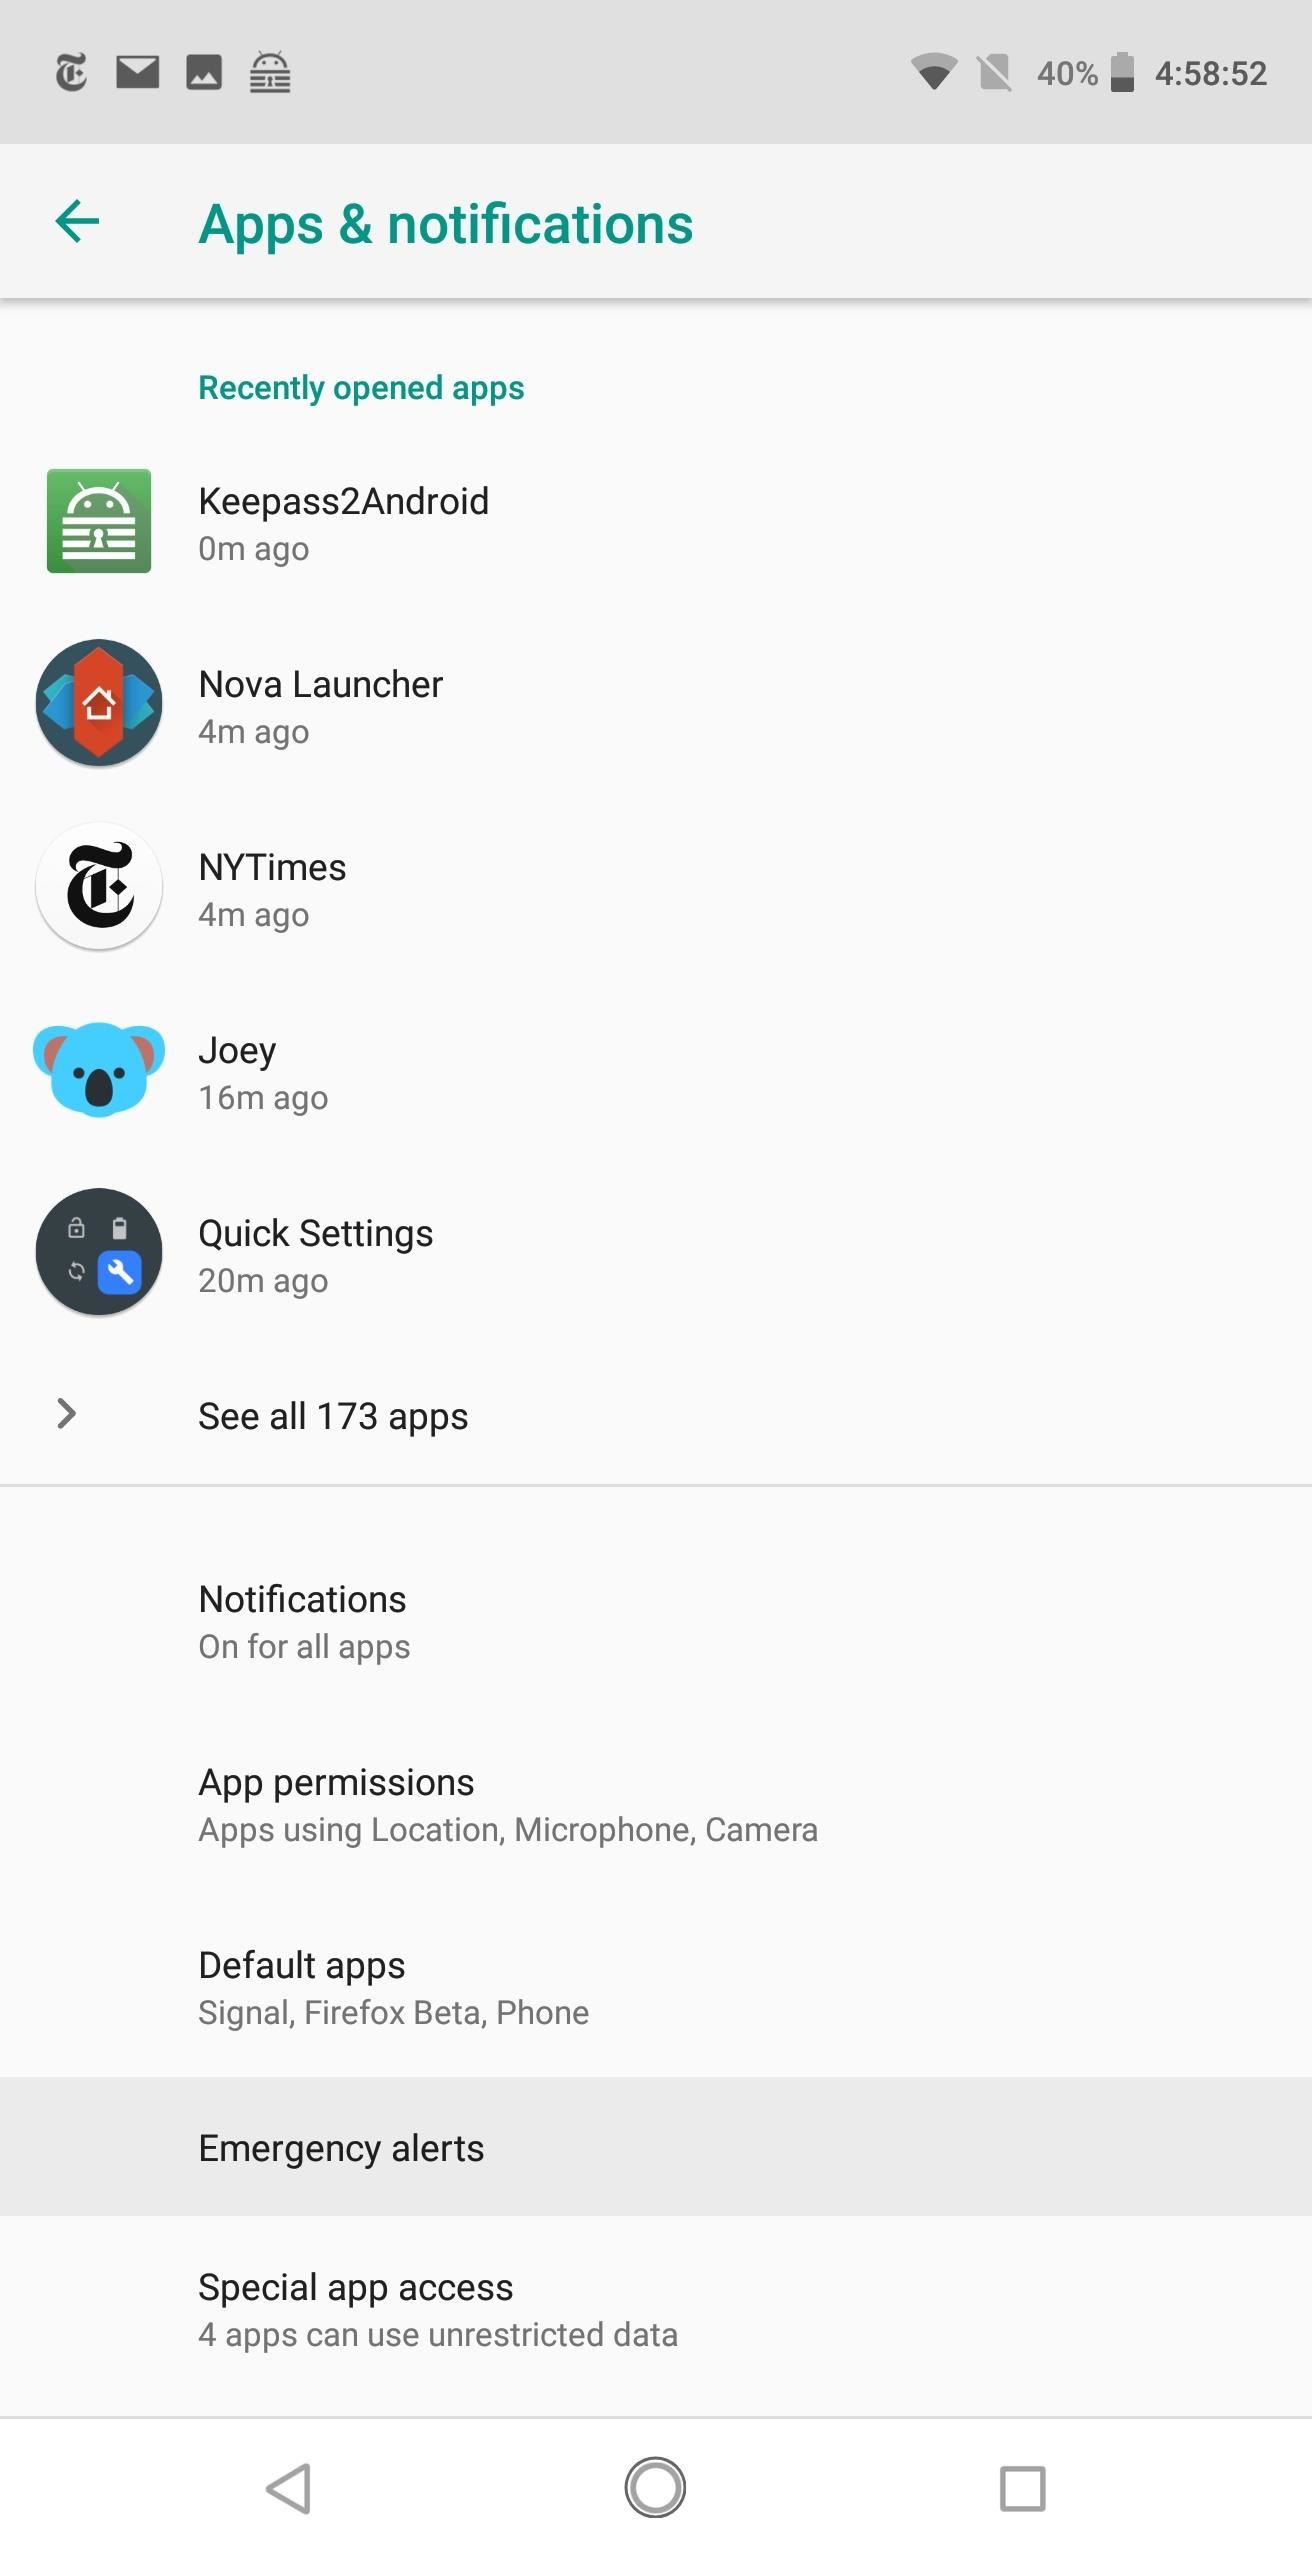
13. Turn Off Emergency AlertsEmergency Alerts, such as AMBER alerts, can be turned off in Android. For phones not running Android 8.1 (or 8.0) Oreo, use the guide below.Don't Miss: How to Turn off Emergency Alerts on Android 7.1 or Lower For Android Oreo users, open up Settings and select "Apps & notifications." Choose "Emergency Alerts," where you can opt to disable individual alerts or all alerts.
14. Keep Your Phone Unlocked in Safe AreasIf you have a fingerprint lock screen set up, you've surely noticed that the scanner can be a little finicky if your hands are sweaty or the scanner itself is dirty. This makes unlocking your phone a chore, but it doesn't have to be that way.Using the "Smart Lock" feature, your phone can automatically unlock itself when it's in a secure environment (e.g., home or work). There are different ways to set this up, so use the guide below to get Smart Lock working the way you want it to.Don't Miss: How to Keep Your Phone Unlocked in Trusted Locations
15. Unlock Your Phone with a Bluetooth DeviceIn the same vein as #10 above, you can also use Smart Lock to keep your phone unlocked when it's paired with certain Bluetooth devices. This is helpful if you have a smartwatch or Bluetooth headphones that you always connect to your phone. If so, you can keep your phone unlocked when it's in range of one of these devices, then it will automatically lock itself when you go too far away.Don't Miss: Unlock Your Phone When It's Paired with a Bluetooth Device
16. Quickly Disable Smart LockThe last two tips certainly help with unlocking your phone faster, but occasionally, there are scenarios where Smart Lock will keep your phone unlocked when you don't want it to be. In these cases, just tap the open lock at the bottom of the lock screen to disable Smart Lock and require fingerprint scanner authentication again. Tapping the open lock icon at the bottom of your lock screen temporarily disables Smart Lock.
17. Open Chrome's Tab Switcher with a SwipeInstead of tapping that tiny icon in the top-right of your screen, just swipe down from the address bar in Chrome to enter the tab switcher interface. Here, you can easily switch tabs, open a new tab, swipe old tabs away, or swipe all the way up five times to find a Chrome Easter egg.
18. Select an Option in a Sub-Menu Without Lifting Your FingerThis is mostly just a fun trick, but you might find it useful. Press and hold the menu button in any app, then drag your finger down to an entry. Once you release your finger on the entry, it will open.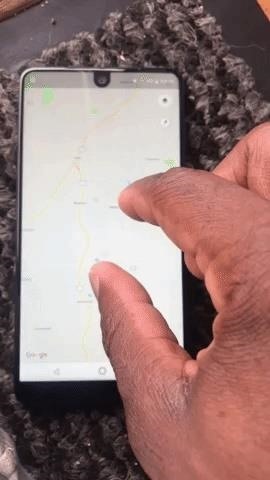
19. Use 2 Fingers in Google Maps to Rotate the MapBy default, Google Maps is oriented to where north is up and south is down. When that gives you trouble visualizing a route or location, you can touch the screen with two fingers, then rotate clockwise or counterclockwise to change Maps' perspective. To reset the orientation, tap the compass icon near the bottom-right corner.
20. Swipe with 2 Fingers in Google Maps to Change the AngleWhen you're checking out a city on Google Maps, try swiping down with two fingers. This will change the perspective from top-down to an off-angle view. If you zoom in far enough and have satellite view enabled, it will even give a 3D effect to tall buildings. To reset the viewing angle, swipe up with two fingers.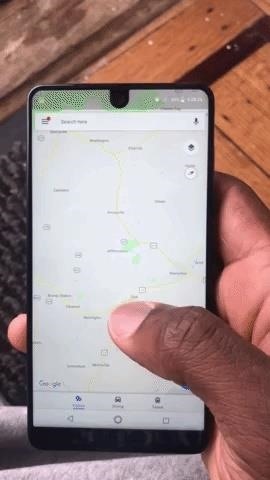
21. Zoom into Maps, Photos & More with 1 FingerMost people know about the pinch-to-zoom gesture, but there's another zoom gesture that works much better when you're holding your phone with one hand. Double tap the display, but don't lift your finger after the second tap. From there, slide your finger up to zoom out and down to zoom in.This gesture works in Maps, Chrome, Photos, and dozens of other apps. I've found that it's more intuitive when you use this gesture with your thumb, so give it a try!
22. Pinch to Zoom YouTube Videos on 18:9 PhonesIf you have a newer phone with small bezels, the screen likely uses an odd aspect ratio. This results in most YouTube content having black bars on either side when watching the video in landscape mode. A majority of phones with taller aspect ratios like 18:9 will allow you to fill out the full screen when you pinch to zoom in the YouTube app.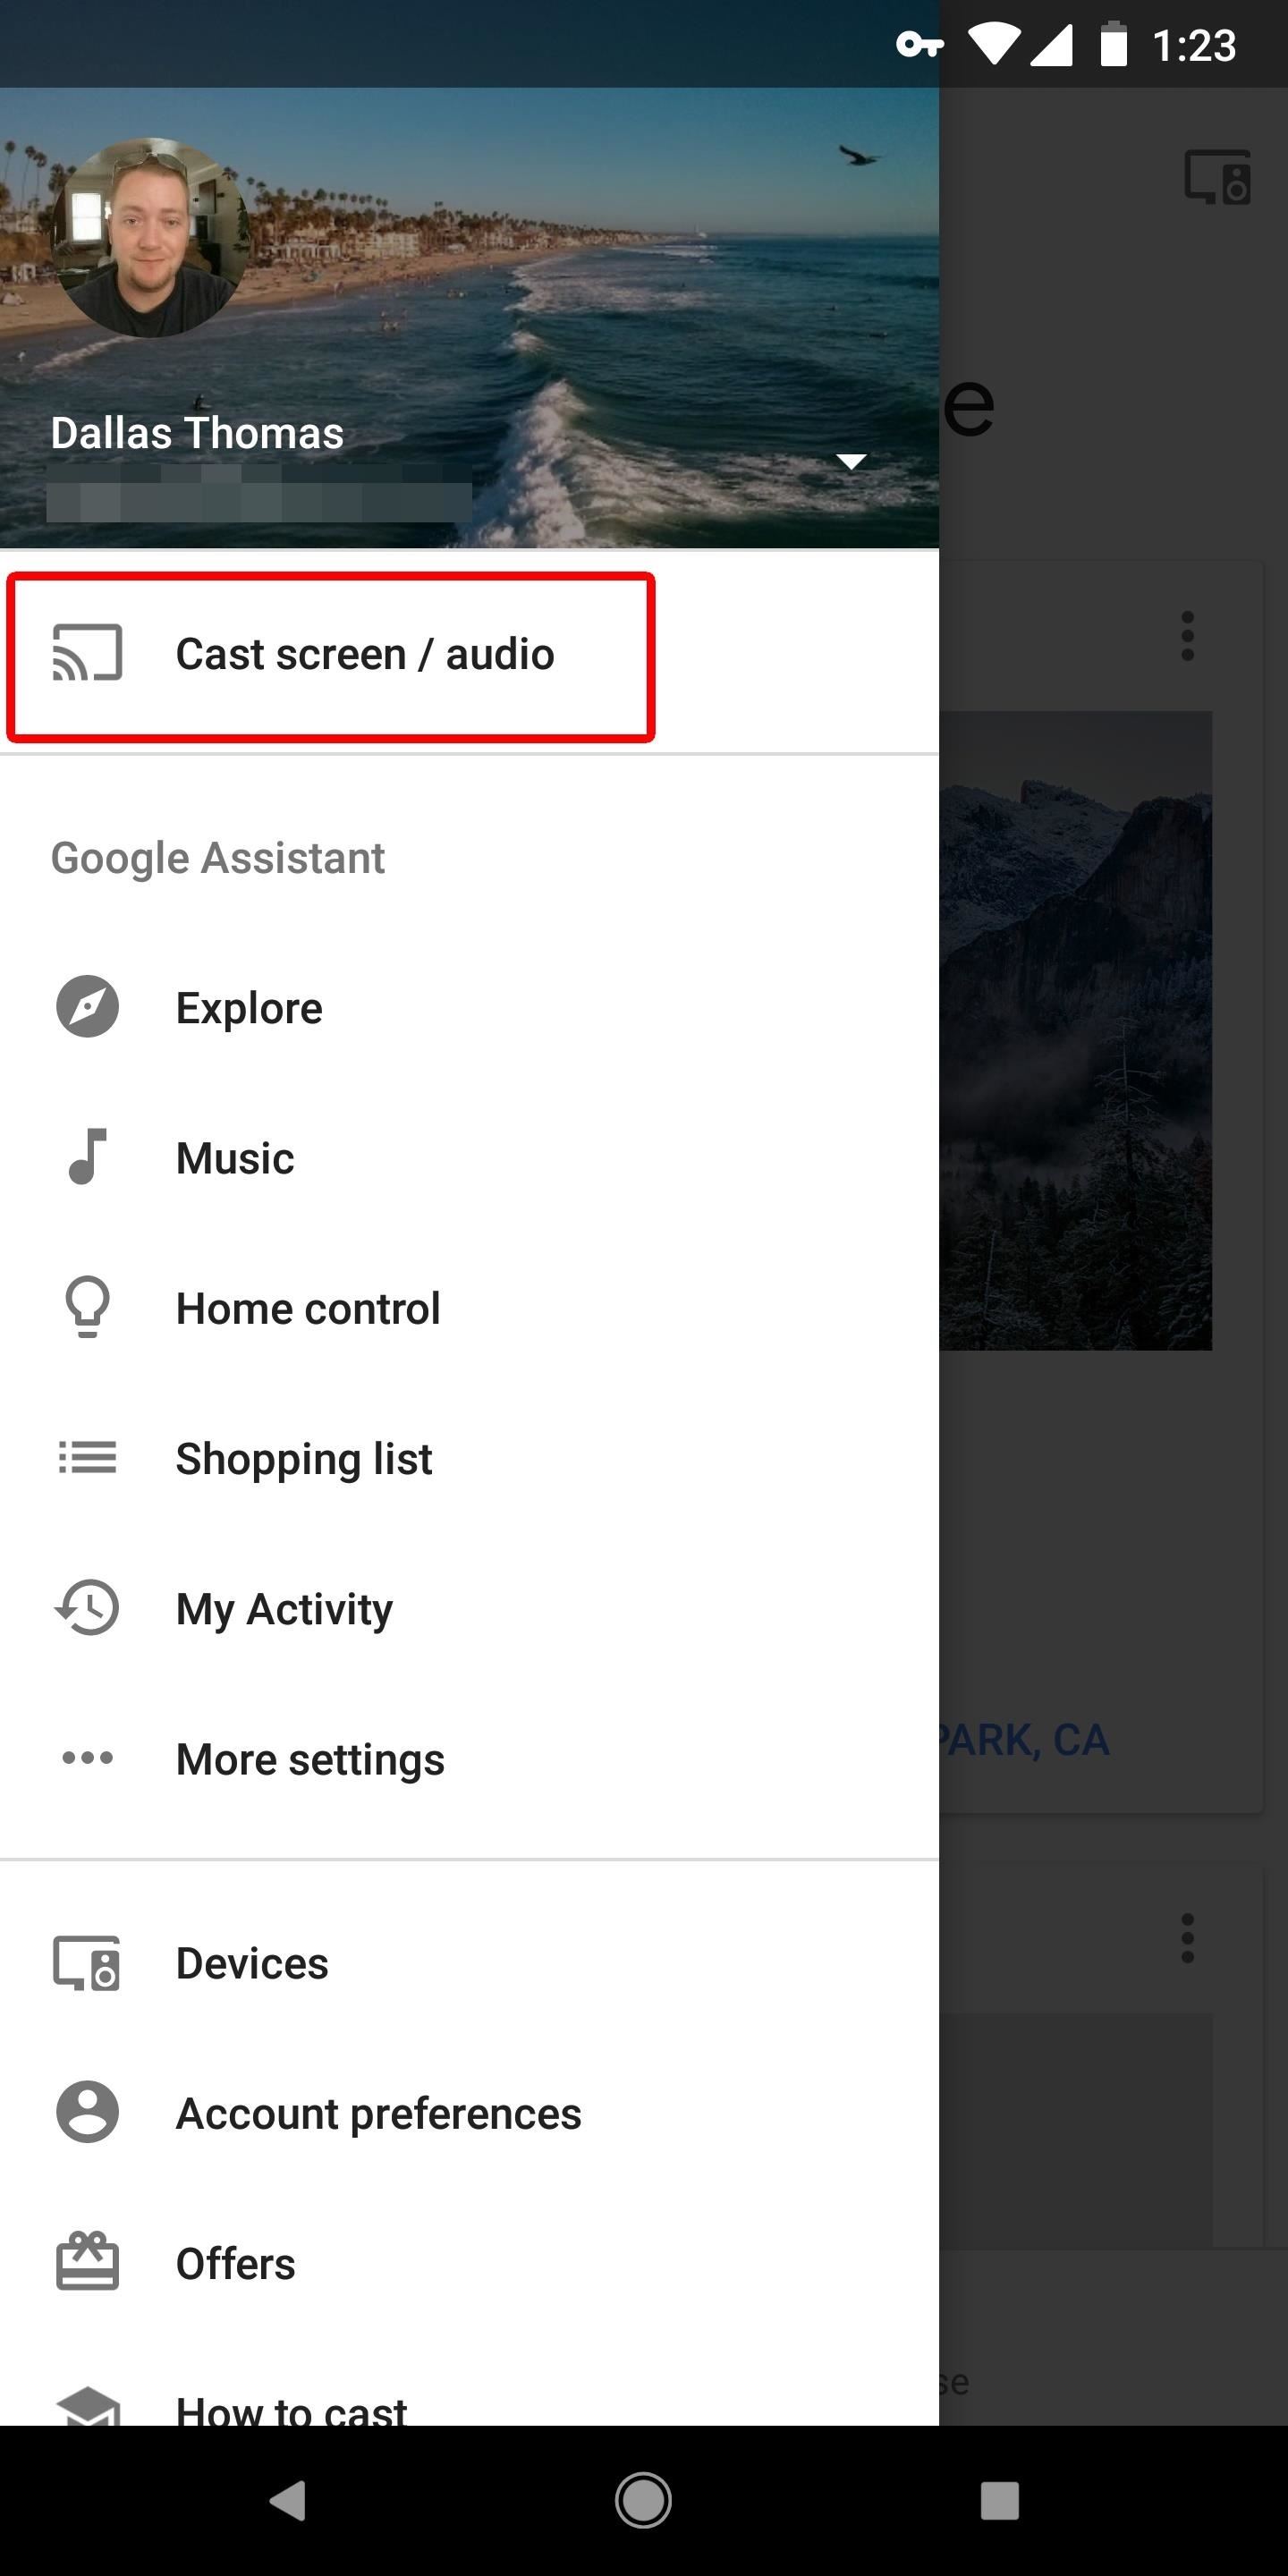
23. Cast Almost Any AppMost media apps have Chromecast support built-in, and you'll know this when you see the cast icon while you're connected to the same Wi-Fi network as your Chromecast. But if a certain app doesn't support Chromecast natively, there's a handy workaround.First, grab the Google Home app. Open it, then tap the hamburger menu in the upper-left corner (or use the previous tip) and choose "Cast screen/audio." Select the "Cast Screen/Audio" button and choose your Chromecast (or Chromecast-compatible device). Once its mirroring your display, navigate to the unsupported app on your phone to view it on your TV.
24. Control Music Volume When Screen Is OffIn case you weren't aware, you can control the volume of music playing even when the screen is off. Just use your physical volume buttons like normal and the sound will adjust — even over Bluetooth!
25. Take Pictures with the Volume RockerWith most phones, the camera app will let you use your volume rocker as a shutter button. In other words, just open your camera app, point it at a subject, then press volume up or volume down to take the shot!If this doesn't work by default, there's a decent chance your phone supports the feature, but has it disabled out of the box. Check in your camera app's settings to see if the feature's there, then simply enable it to try it out.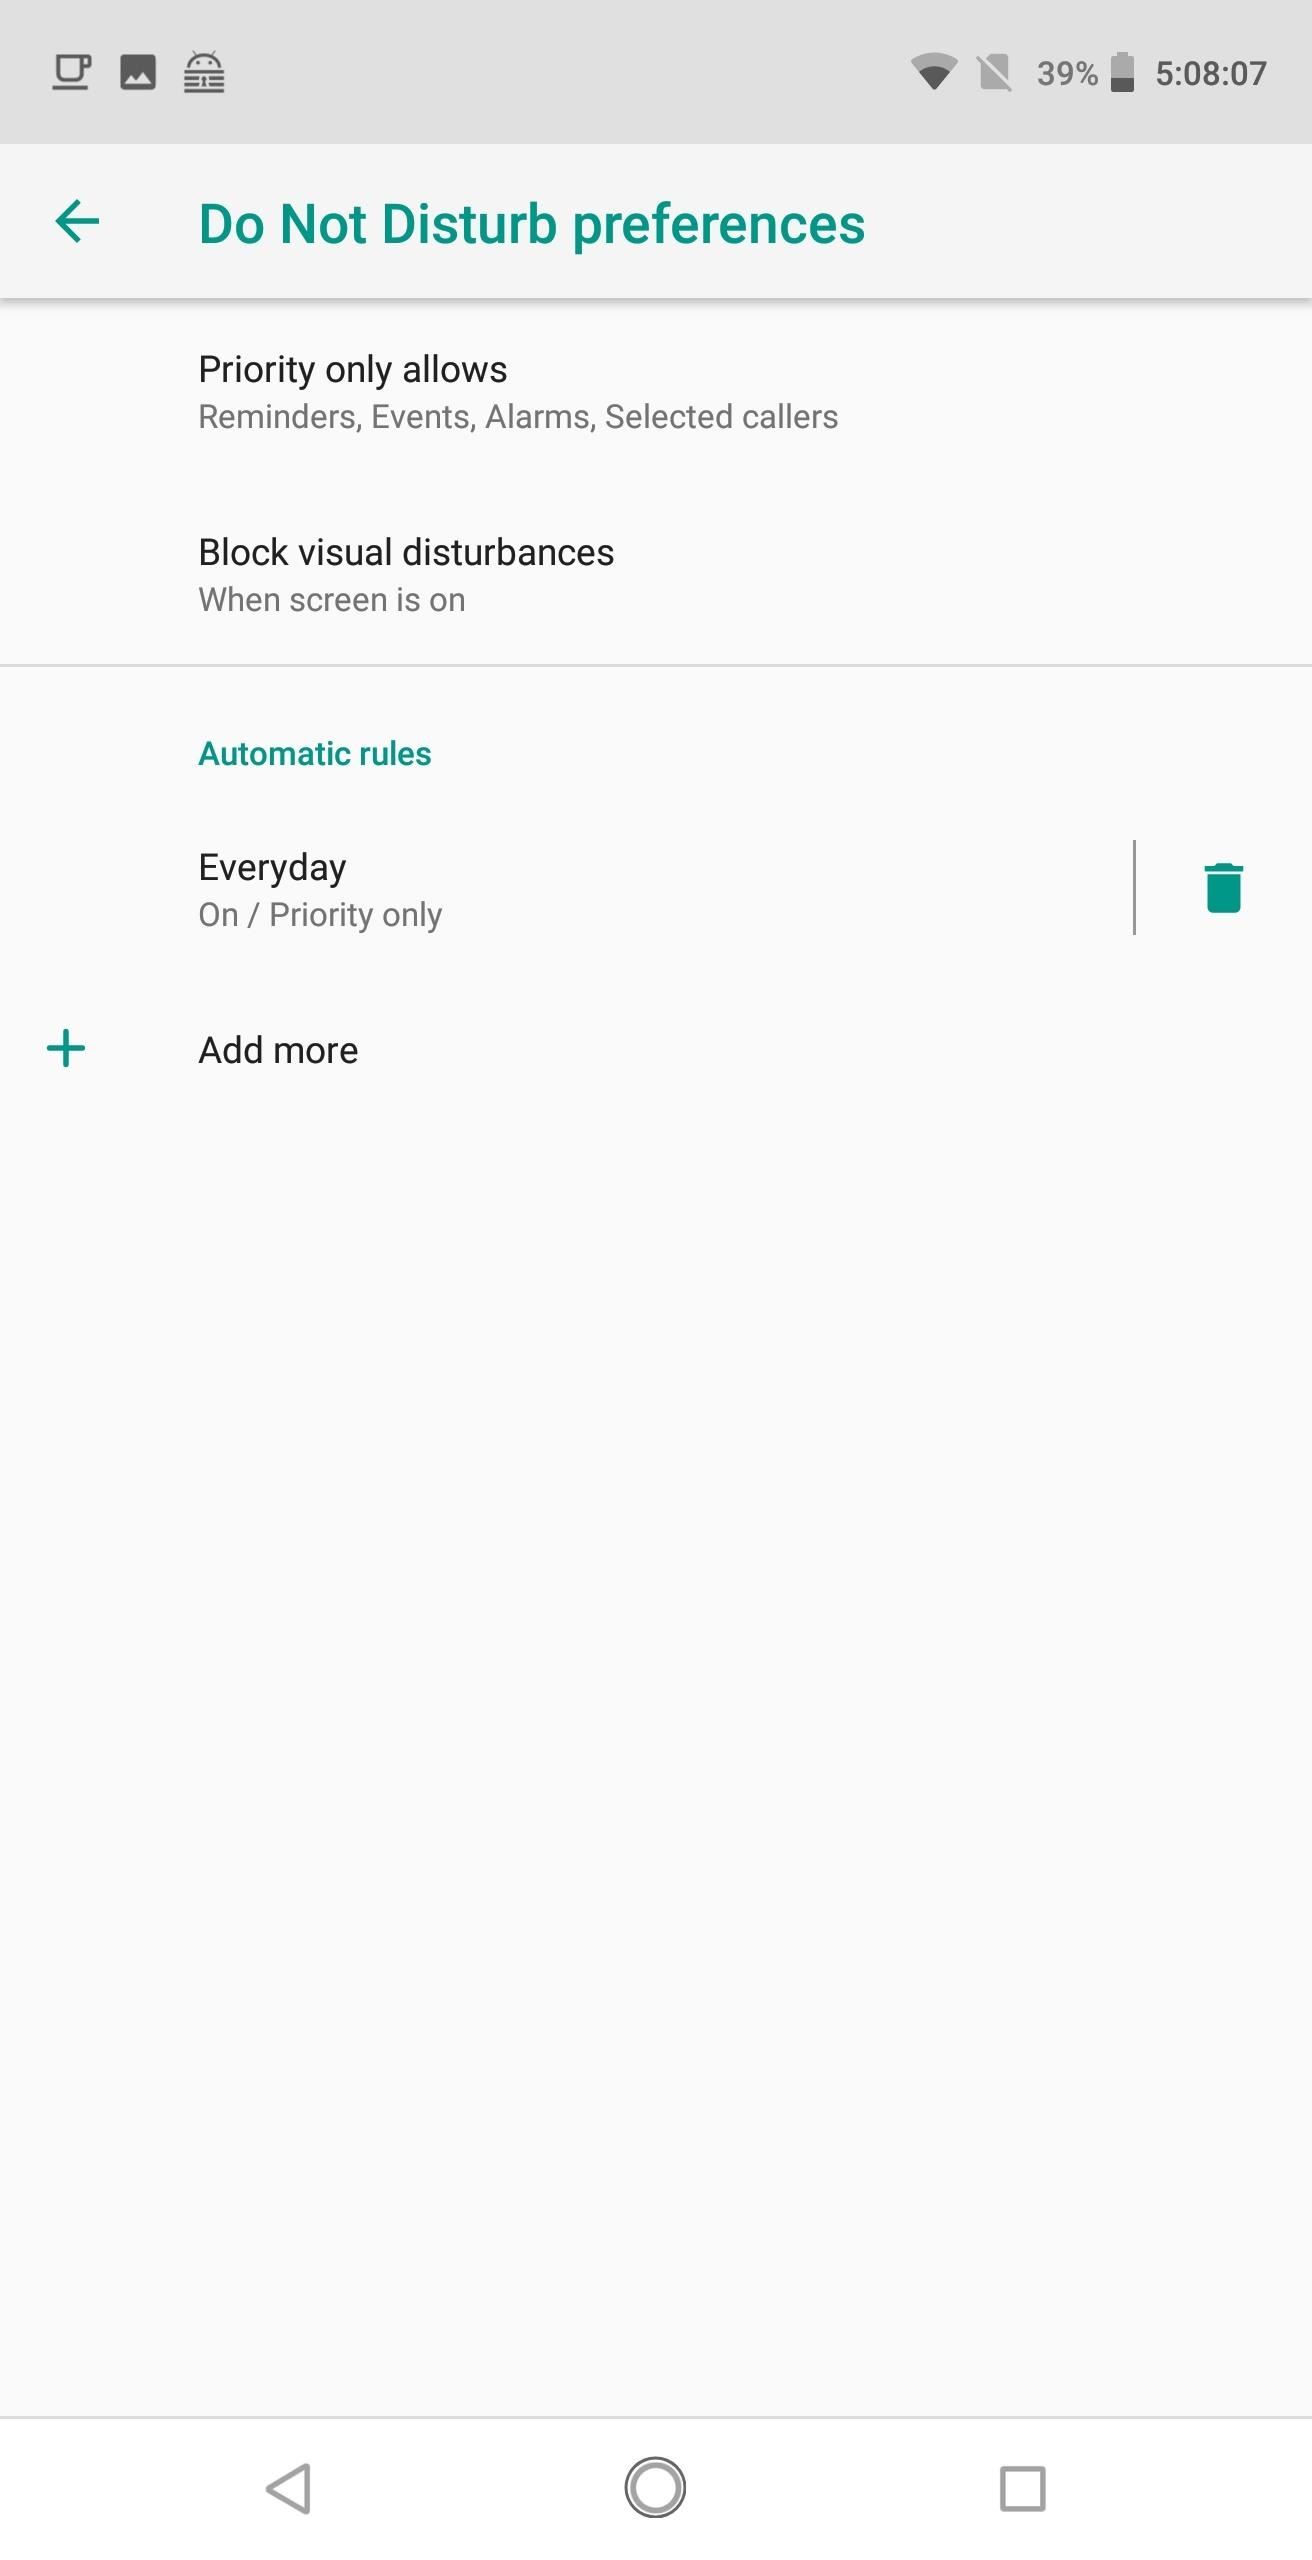
26. Automatic Do Not Disturb at a Certain TimeAndroid's Do Not Disturb features are actually pretty awesome — if set up properly, your phone can automatically turn ringtones, vibrations, and notification sounds off during certain hours.While some OEMs may have it in a slightly different menu, most people can try this by opening Settings and selecting "Sound." Choose "Do Not Disturb preferences" and select "Add more" under Automatic Rules. For Oreo users, choose "Time rule" then follow the instructions.
27. Type to Google AssistantMost Android users know that you can launch the Google Assistant by simply long-pressing your home button — but did you know you don't actually have to talk to it? With Google Assistant open, tap the keyboard icon in the bottom-left corner of your display. This will let you type to the Assistant in situations where talking to your phone would feel awkward.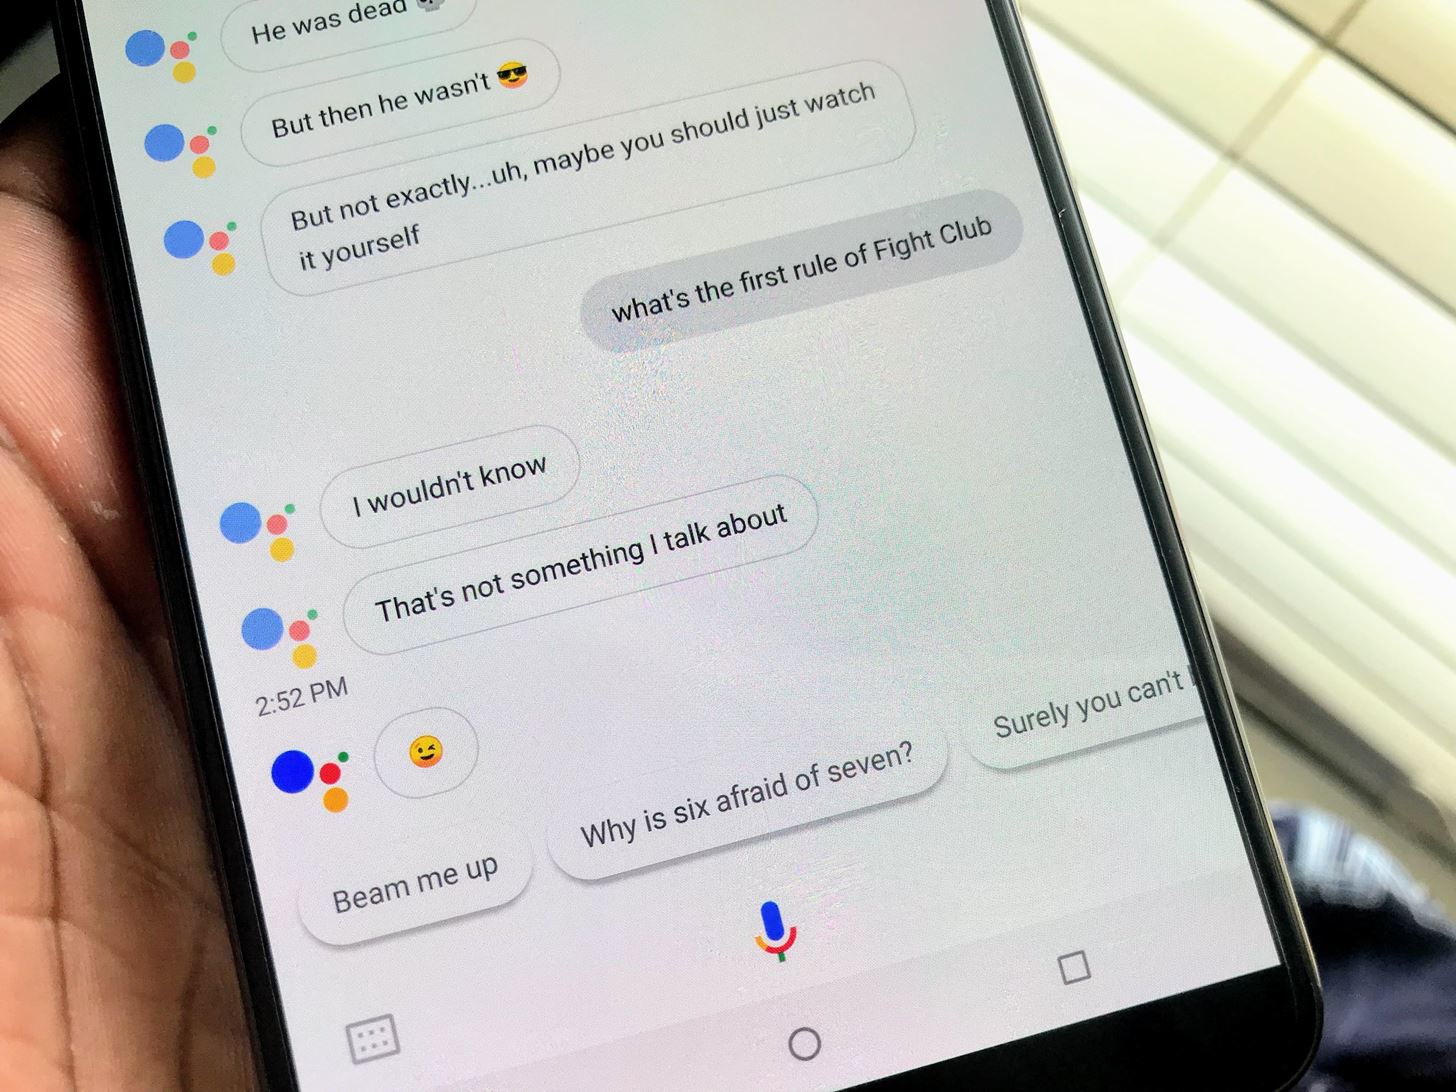
28. Google Assistant Easter EggsGoogle Assistant has an abundance of different commands to assist your day. Google also included a few Easter eggs for fans, such as movie references and internet jokes. Check out the link below for just some of the commands that help unlock Google Assistant's hidden potential.Don't Miss: 70 Easter Eggs & Interesting Voice Commands for Google Assistant
29. Use Google Lens to Add Contact Info from Business CardsGoogle Lens is now available to all Android phones via Google Photos. This means you can have the Google Assistant scan your pictures to pick out relevant info and even act on it. One of the best uses for this new tool is scanning business cards.You can check out the link below for a step-by-step guide on how to do this, but the process is pretty simple. Just take a picture of the business card, then open that picture in the Google Photos app later. From there, press the Google Lens button and tap "Add contact" when prompted.Don't Miss: How to Use Google Lens to Save Contact Info from Business Cards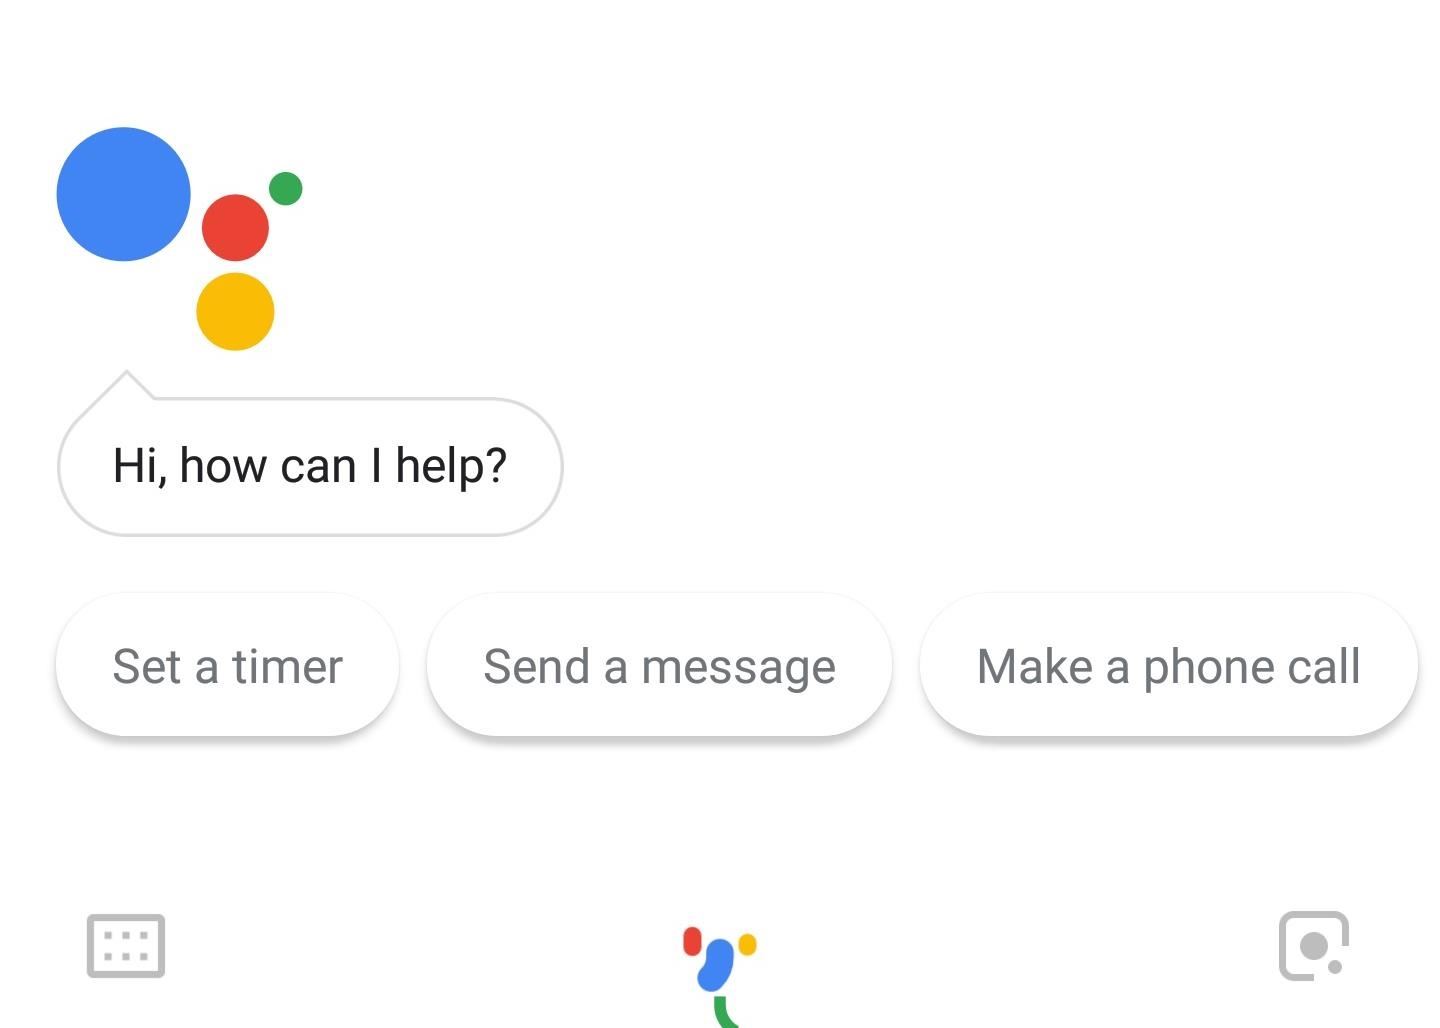
30. Learn More About Objects in Your Camera's ViewfinderGoogle Lens is good for more than just scanning business cards, and it's baked into the Google Assistant app on several phones (LG V30, Galaxy S9, and Google Pixel, to name a few). To try it out, long-press the home button to bring up Google Assistant. Tap the button in the bottom-right corner to bring up Google Lens, then tap on the object you want to learn more about.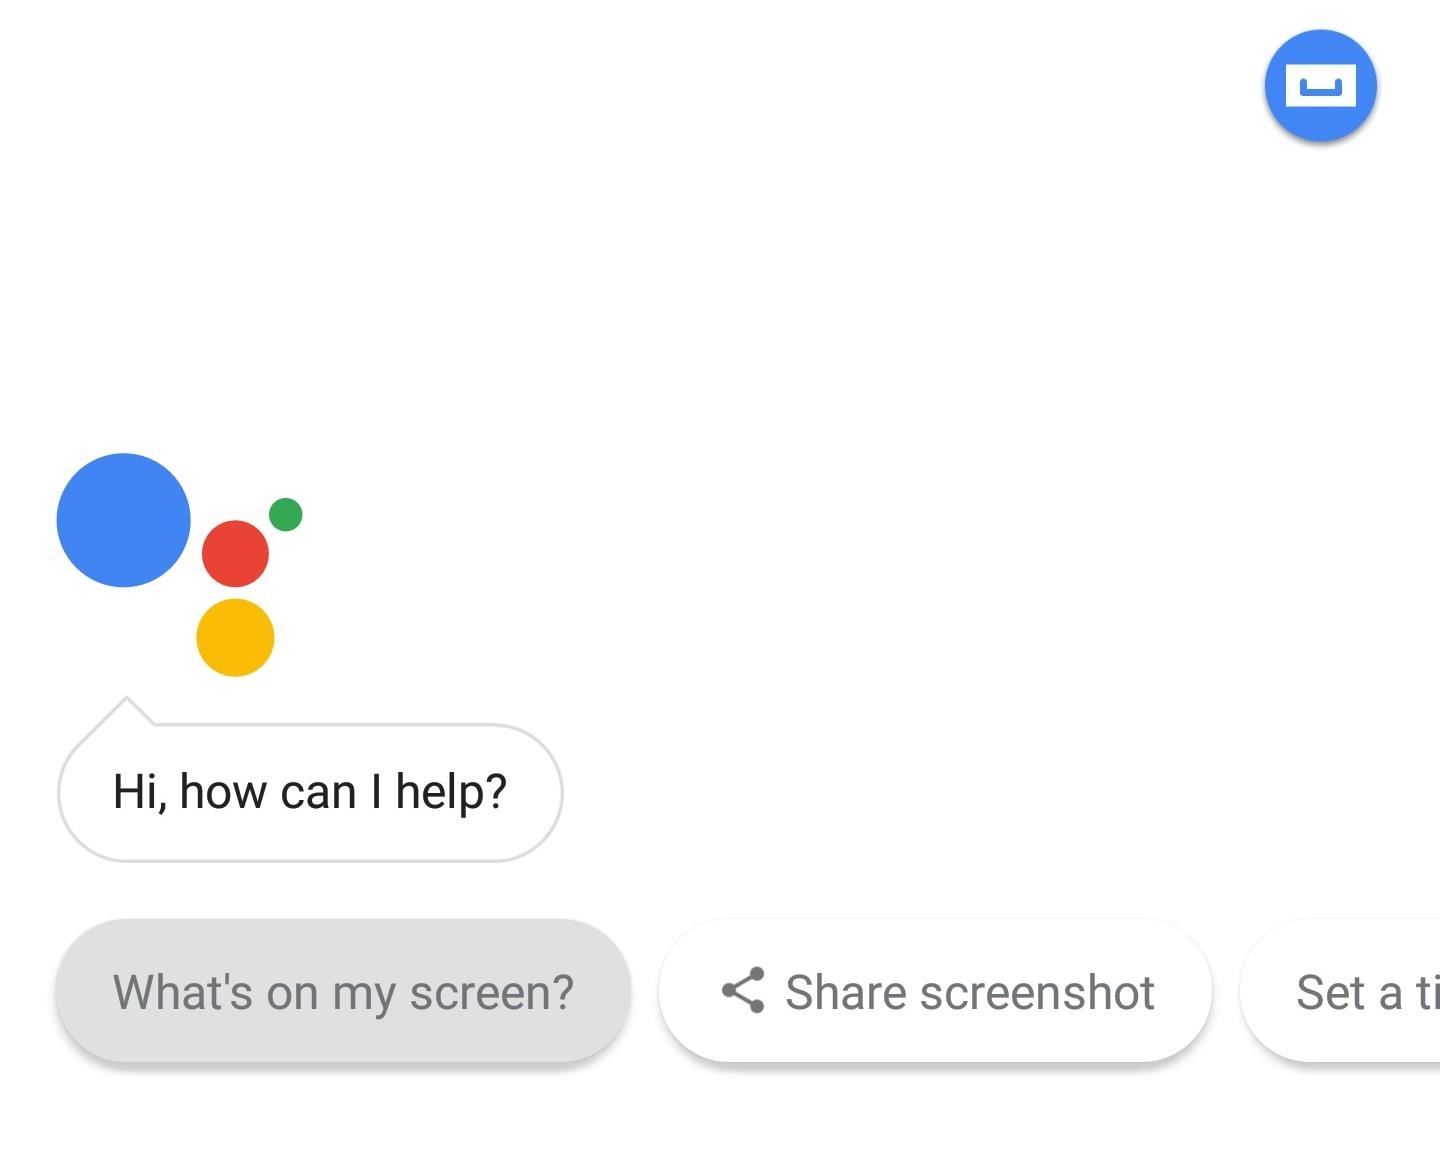
31. 'Google Lens' Workaround for Older PhonesIf you don't have a current-generation flagship, Google Lens probably isn't available for your device just yet. Google will surely roll the feature out to all phones eventually, but in the meantime, you can try this workaround.Open your camera app and focus on the object you want to learn about. While the camera's still open, long-press the home button to bring up Google Assistant, then touch the "What on My Screen?" button along the bottom (you may need to scroll to the right to find it). Now, Google Assistant will do its best to find more info about the object you're looking at — quite similar to Google Lens functionality.
32. Access Common App Functions with a Long-PressStarting in Android 7.0, apps can now add a context menu that pops up when you long-press their home screen icon. The actions in this menu are typically the most common things you'd do with that particular app, so they're quite handy. The feature even works on older Android versions if you're using a custom launcher like Nova or Action.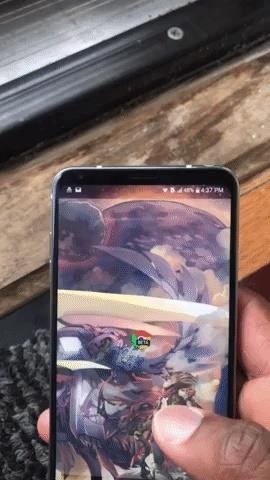
33. Make Icons Out of App ShortcutsThe "App Shortcuts" feature mentioned above gets even better when you realize this: Each option in the popup menu can be added to your home screen. Long-press the icon on the home screen to bring up its App Shortcuts, then long-press a shortcut and drag it to the home screen. Note: This feature requires Android 7.0 or higher.Now that you know about these tips and shortcuts, you're one step closer to becoming an Android pro. Share this article with your friends so they too can learn a few additional ways to enjoy their phone. And if you know about any nifty little tips we didn't mention here, please share them below in the comment section.Don't Miss: If You Don't Care About Privacy, Here What You Get By Giving Google All Your DataFollow Gadget Hacks on Facebook, Twitter, YouTube, and Flipboard Follow WonderHowTo on Facebook, Twitter, Pinterest, and Flipboard
Cover image and screenshots by Jon Knight/Gadget Hacks
The left and right swipe action in Gmail for Android, by default, is "Archive." If you wish, you can customize it and here is how:angle-right Open Gmail app.angle-rightTap Hamburger icon (three vertical lines) at the top.
How to Set Swiping to Delete or Archive Gmail on iPhone
How To: Add, hide and remove home screen widgets on a Nokia N97 How To: Set up a new email account on a Nokia N97 smartphone How To: Use the home screen on a Nokia N97 mobile phone How To: Use handy shortcuts on a Nokia N97 Mini smartphone
How To Add Widgets To Your Home Screen (for Android) - YouTube
24 easy ways to clear storage space on an iPhone or iPad each if there are a lot, you can just swipe your finger around the screen to select them). Windows that can free up a huge amount
How to Free Up Storage Space on Android & Keep It from
News: This Hack Turns Your iPad into a Multi-Window Multitasking Powerhouse for $10 How To: Create Transparent Floating Windows on Your Galaxy Note 9 How To: Enable the Hidden Dark Mode in Windows 10 How To: Use Split View Mode in Mac OS X 10.11 El Capitan
Little Boxes Turns Your iPad into an Old-Fashioned Music Box
If your phone is currently in a bootloop and you're unable to access Magisk Manager, start by booting into TWRP. You can do this on most phones by holding the volume down button between bootloops — i.e., when the screen goes black.
Problem in Hacking Android Phone « Null Byte :: WonderHowTo
At this point, the app will be closed completely and won't be running in the background anymore. If there are apps that are consuming a lot of battery on your iPhone, such as Facebook, WhatsApp, or Telegram, then you can force quit them to save battery.
By now, if you're an iPhone owner, you've probably updated to iOS 11 by now. If not, you really should, and not just for the animoji.The latest iOS update bakes in a few important security
24 iOS 11 Privacy & Security Settings You Should Check Right Now
While the iPhone XS and XS Max come equipped with 4 GB of random access memory, and the iPhone XR with 3 GB of RAM, Apple's latest flagships are still susceptible to occasional slowdowns in performance in iOS 12. This can be fixed by clearing RAM, but the process is now a little trickier compared to
How to Clear RAM on iPhone X, Xs, Xs Max, and XR
The Ring/Silent switch on the side of the iPhone has always had one purpose—to toggle ring mode/silent mode. But in iOS 9, Apple gave us another choice, and that's locking the orientation of the screen. This could be a great new feature for some of you. Personally, I usually have my phone on
How to Disable the Ring/Silent Switch on an iPhone | It Still
This feature is not available right now. Please try again later.
How To Use Android Phone Without Activation - pcroger.com
How To: Get Quick-Access Pandora Controls in the Notification Tray of Your Galaxy Note 3 How To: Save Battery Power on a Samsung Galaxy S4 with Moto X Style "Active Display" Notifications Samsung Android Pie Update: Galaxy Devices Are Getting All-New Home Screen Icons
Turn Your Phone's Notifications Tray into the Ultimate To-Do
But if you are still set on your ways and want to know how to close apps on the iPhone X, read below. How to Close Apps on iPhone X in iOS 11 Step 1: Swipe Up and Hold. Bring up the App Switcher on the iPhone X by swiping up from the bottom of the screen, holding your finger on the screen for a second and then removing it. Step 2: Tap and Hold
How to Force Close All Apps at the Same Time on iPhone
Uploads from social accounts such as Facebook or Instagram cannot be stopped. You can stop an upload from the mobile app if you are manually selecting photos. What happens if I lose Internet connection or turn off my computer during an upload? If you lose connection while you're using the Upload tab from your Shutterfly Photos on the web, we
How to Download Your Photos from Facebook
0 komentar:
Posting Komentar