How To: Make an Arduino Shield
Two years ago, driven by a good friend of mine i decided to give it a try on timelapse photography. I had a DSLR camera but didn't had an intervalometer, so i assembled a small electronic circuit on top of an Arduino Uno, made some basic code and did my first timelapse movie. The result was awful, but for some reason I was hooked.Since that day I have never stopped looking for ways to evolve. I studied and tried various techniques until i got better. But, as i got better i felt something was missing. I needed motion control to give my timelapse movies a cinematographic feel. So, i did a market research and found out that there were great timelapse motion control devices for sell, but all of them were to expensive for me. So i had the idea to make an Arduino shield keeping in mind that i needed to control, at least, 1 dc motor, camera focus, camera shutter and for the 2 remaining axis i chose to control the Skywatcher's Acuter All in One pano head (also tested with Virtuoso Mount).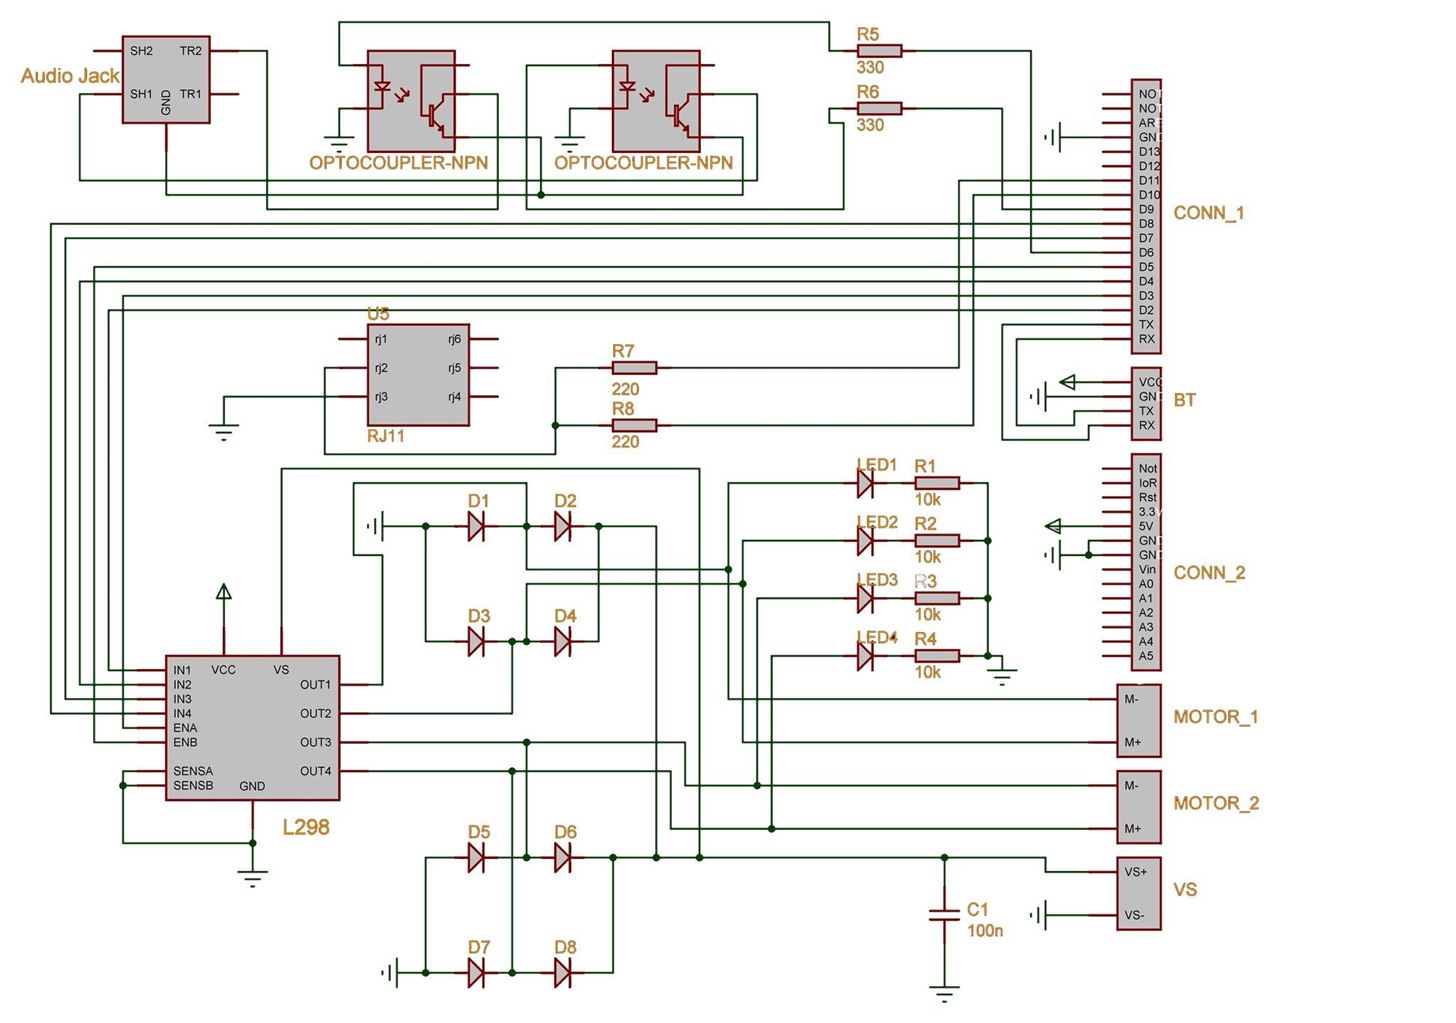
Step 1: Drawing the Schematics.Use an electronic design software and draw the following schematic.If the scheme is not clearly visible please download the pdf file.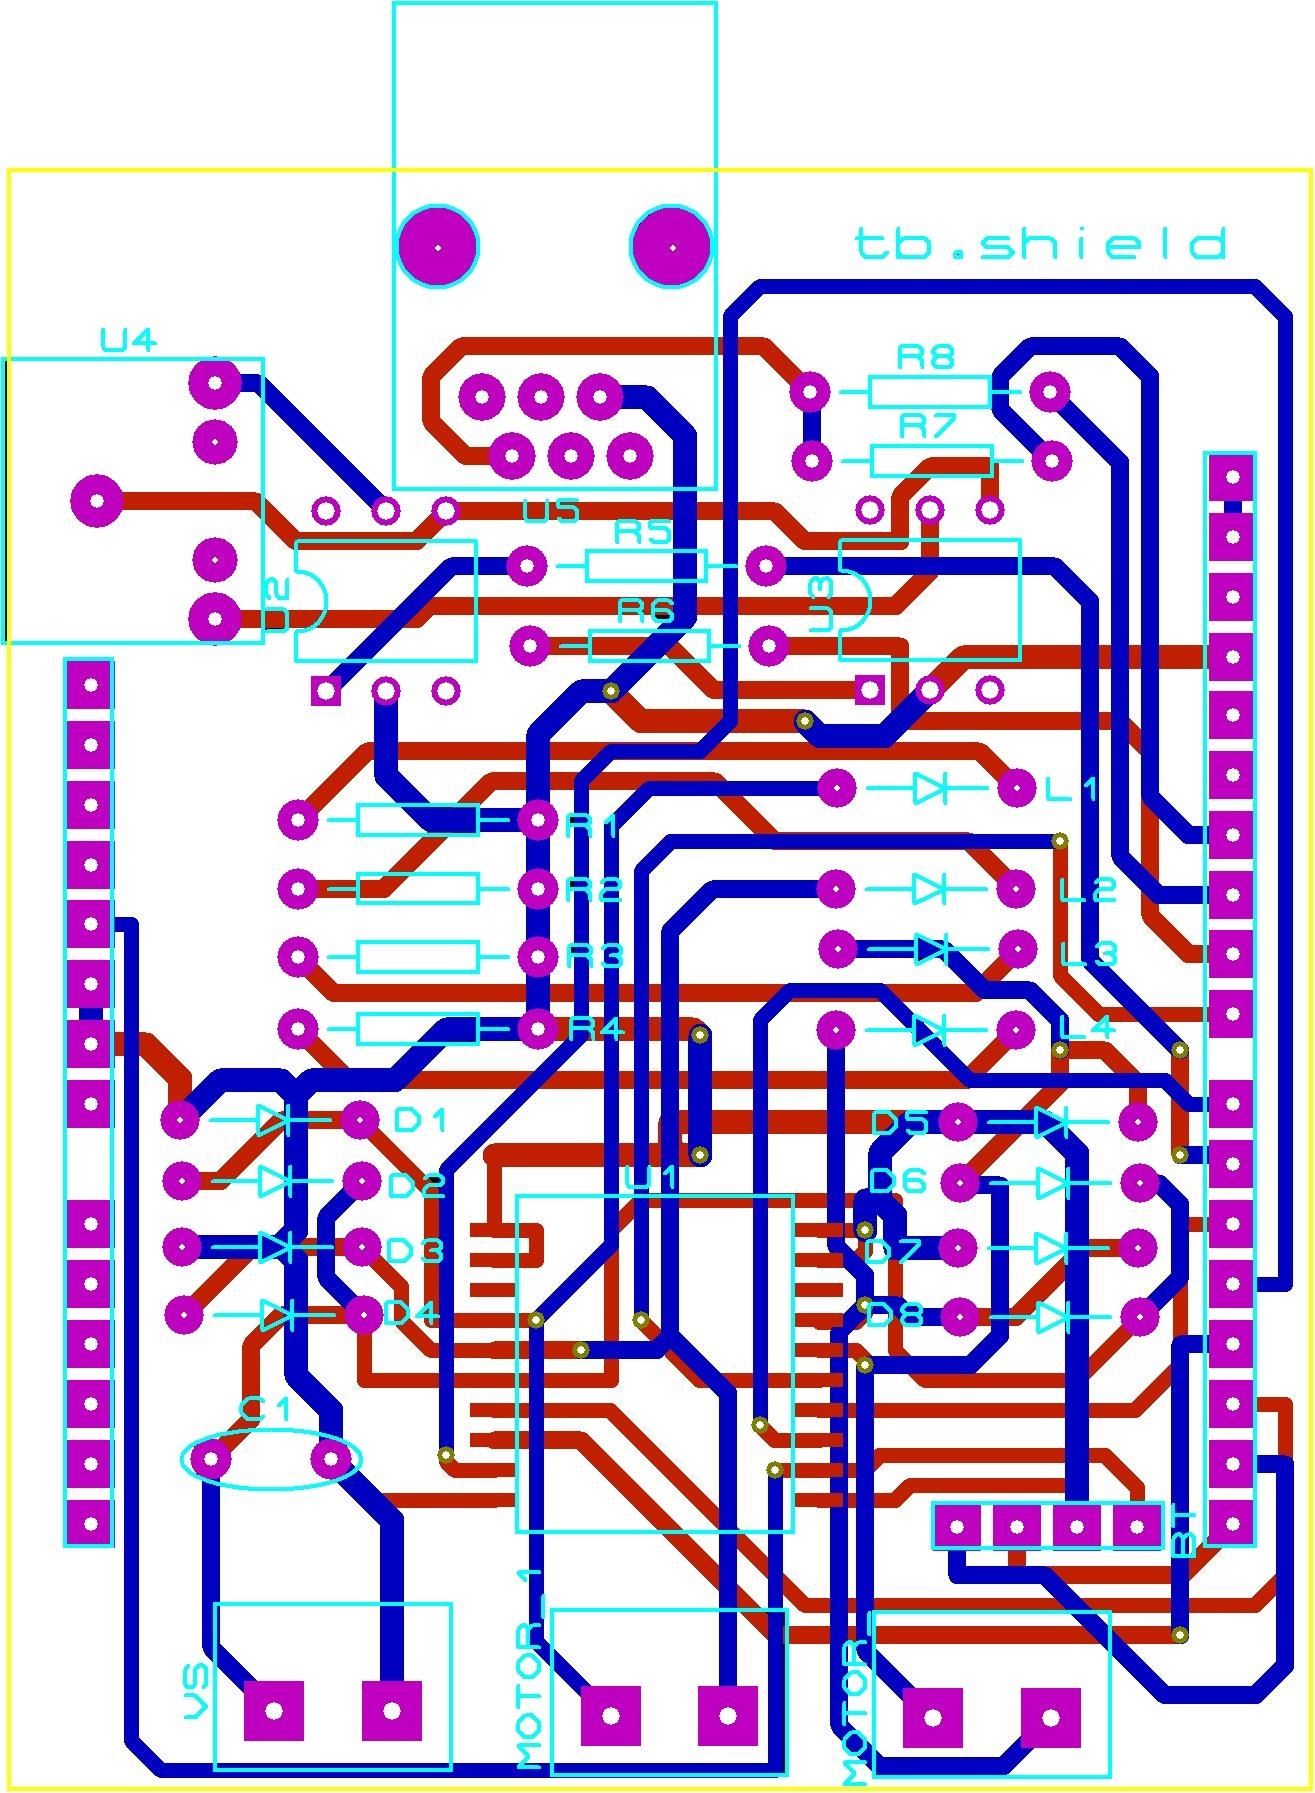
Step 2: PCBDraw the PCB layout.
Step 3: Gerber FilesMost of the electronic design softwares available will provide the ability to automatically generate the necessary gerber files to manufacture the PCB´s. If you don´t have one you can download the gerber files here: Gerber files.
Downloads |
This work is licensed under a Creative Commons Attribution 4.0 International License, which means that you can freely share, remix and make commercial use of this work as long as you attribute it to timeblocks.wordpress.com and keep the same license. I´ll update whenever I have new designs and/or code so don´t forget to like our facebook…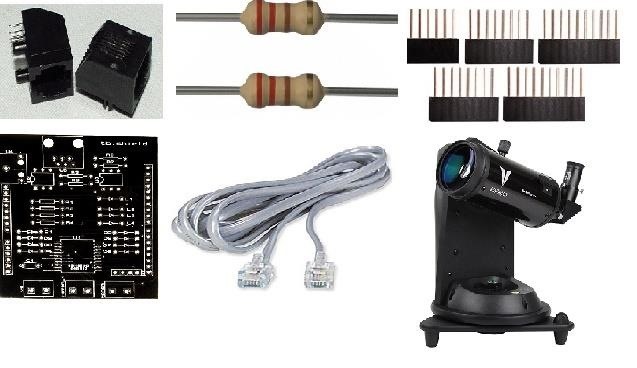
Step 4: First Test – Controlling Skywatcher Virtuoso Mount https://vimeo.com/100834758Picture of First test – controlling Skywatcher Virtuoso MountWhat you´ll need:1 x RJ11 connector 2 x 220 Ohm Resistor 2 x 8 pin Arduino Stackable Header, 1 x 6 pin Arduino Stackable Header and 1 x 10 pin Arduino Stackable Header 1 x Comunication Cable 1 x tb.shield PCB 1 x Virtuoso Mount Panohead Library and code: https://timeblocks.wordpress.com/downloads/Code:# include# includevoid setup() {panohead.init();}void loop() {long lngPositionPitch = 0;long lngPositionYaw = 0;//Read current positionlngPositionPitch = panohead.readAxisPosition(PANOHAXISPITCH);lngPositionYaw = panohead.readAxisPosition(PANOHAXISYAW);lngPositionPitch = lngPositionPitch + panohead.fromAngle(20.0);lngPositionYaw = lngPositionYaw + panohead.fromAngle(20.0);// 20 degrees motion in both axispanohead.driveToPositionBothAxis(lngPositionYaw, lngPositionPitch);delay(20000);lngPositionPitch = panohead.readAxisPosition(PANOHAXISPITCH);lngPositionYaw = panohead.readAxisPosition(PANOHAXISYAW);lngPositionPitch = lngPositionPitch + panohead.fromAngle(-20.0);lngPositionYaw = lngPositionYaw + panohead.fromAngle(-20.0);// 20 degrees motion in both axis in the opposite directionpanohead.driveToPositionBothAxis(lngPositionYaw, lngPositionPitch);delay(20000);}Now we just have to solder the RJ11 (U5 on PCB), the two 220 Ohm Resistor (R7 and R8 on PCB) and the stackable headers in the right places, connect everything and upload the code to the Arduino Board. The Virtuoso Mount should move the two axis 20 degrees in one direction and after 20 sec in the other one.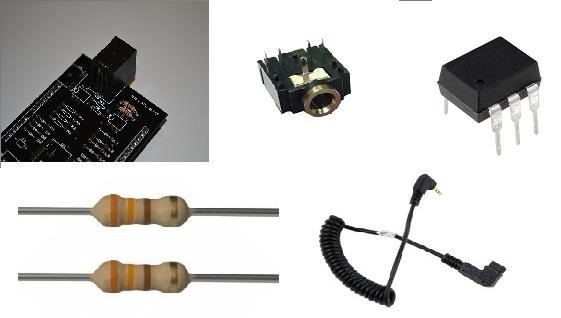
Step 5: Second Test - Controlling Camera Shutter https://vimeo.com/101553708Picture of Second test - controlling camera shutterWhat you´ll need:1 x tb.shield 1 x 3.5mm stereo audio jack 2 x optocoupler 4N25 2 x 330 Ohm Resistor 1 x release shutter cable The code: https://timeblocks.wordpress.com/downloads/# define PINFOCUS 6 // focus# define PINSHUTTER 9 // shuttervoid setup(){pinMode(PINFOCUS, OUTPUT);pinMode(PINSHUTTER, OUTPUT);}void loop(){digitalWrite(PINFOCUS, HIGH);delay(100);digitalWrite(PINSHUTTER, HIGH);delay(100);digitalWrite(PINFOCUS, LOW);digitalWrite(PINSHUTTER, LOW);delay(4800);}Now you just have to solder the 3.5mm stereo audio jack (U4 on PCB), the two optocouplers 4N25 (U2 and U3 on PCB) and the two 330 Ohm Resistors (R5 and R6 on PCB) in the right places, connect the camera to the 3.5mm stereo audio jack on the tb.shield and upload the code to the Arduino Board. The camera shutter should trigger every 5 sec.
Step 6: Third Test - Controlling Motors https://vimeo.com/101917574Picture of Third test - controlling motorsWhat you´ll need:1 x tb.shield 1 x L298P 8 x diode 4004 4 x 10k Ohm Resistor 4 x 5mm led 3 x 2 pin screw connector 1 x DC Motor 1 x 9v battery adapter 1 x 9v battery The code for motor 1:https://timeblocks.wordpress.com/downloads/# define PINM1DIRECTIONFW 2 // m1 forward# define PINM1DIRECTIONRV 4 // m1 reverse# define PINM1SPEED 3 // m1 speedvoid setup(){pinMode(PINM1DIRECTIONFW, OUTPUT);pinMode(PINM1DIRECTIONRV, OUTPUT);pinMode(define PINM1SPEED, OUTPUT);}void loop(){analogWrite(PINM1SPEED, 255);digitalWrite(PINM1DIRECTIONFW, HIGH);digitalWrite(PINM1DIRECTIONRV, LOW);delay(5000);digitalWrite(PINM1DIRECTIONFW, LOW);digitalWrite(PINM1DIRECTIONRV, LOW);delay(5000);digitalWrite(PINM1DIRECTIONFW, LOW);digitalWrite(PINM1DIRECTIONRV, HIGH);delay(5000);digitalWrite(PINM1DIRECTIONFW, LOW);digitalWrite(PINM1DIRECTIONRV, LOW);delay(5000);}The code for motor 2: https://timeblocks.wordpress.com/downloads/# define PINM1DIRECTIONFW 7 // m1 forward# define PINM1DIRECTIONRV 8 // m1 reverse# define PINM1SPEED 5 // m1 speedvoid setup(){pinMode(PINM1DIRECTIONFW, OUTPUT);pinMode(PINM1DIRECTIONRV, OUTPUT);pinMode(define PINM1SPEED, OUTPUT);}void loop(){analogWrite(PINM1SPEED, 255);digitalWrite(PINM1DIRECTIONFW, HIGH);digitalWrite(PINM1DIRECTIONRV, LOW);delay(5000);digitalWrite(PINM1DIRECTIONFW, LOW);digitalWrite(PINM1DIRECTIONRV, LOW);delay(5000);digitalWrite(PINM1DIRECTIONFW, LOW);digitalWrite(PINM1DIRECTIONRV, HIGH);delay(5000);digitalWrite(PINM1DIRECTIONFW, LOW);digitalWrite(PINM1DIRECTIONRV, LOW);delay(5000);}Now you just have to solder the L298P C.I. (U1 on PCB), the 8 diodes 4004 (D1 to D8 on PCB), the 4 10k Ohm Resistor (R1 to R4 on PCB), the 4 5mm leds (L1 to L4 on PCB) and the 3 x 2 pin screw connector (VS, MOTOR and MOTOR1 on PCB) in the right places, connect everything and upload the code to the Arduino Board.
Step 7: Make Amazing Timelapse Films. https://vimeo.com/101120640Now its time to make use of your fully assembled tb.shield and start making amazing timelapse movies. I hope you enjoyed this instructable.I´ll keep it updated. Feel free to comment.Have fun,PatrÃcio
VideoJug shows you how to take part in a web chat without causing offence to anyone. This is a guide to internet chat room behaviour covering creating a persona to safety.
How to Behave on IRC: 9 Steps (with Pictures) - wikiHow
Bored in your cubicle all day? It's time for helicopter wars! This video shows you how to make a fun and simple helicopter out of some basic office supplies. The materials you will need are: a big paper clip, a smaller paper clip, a large aluminum can (such as from Rockstar or Monster energy drinks), a ruler, Scotch tape, a rubber band, a pair of pliers (if you have a Leatherman multitool
Chopper Brothers Build Haiti's First DIY Helicopter
How to get iOS4 Wallpaper and Multitasking on iPhone 3G Enable Multitasking and Home-screen Wallpaper on iPod Touch 2G and iPhone 3G! Jailbreak iPod Touch 3G, 8GO, iOS 4.0 + activation
Enable Multitasking Gestures On iPad 1G On iOS 5 [No Jailbreak]
To help save battery power, you can choose a lower screen timeout setting on your Samsung Galaxy S4. How to turn off the screen lock on my Samsung Galaxy S III;
Turn On Your Android's Flashlight Using the Power Button
While remotely hacking into someone's phone and gaining access to their system files and photos is extremely difficult, hacking into an email account is much easier. While MMS is usually the method of choice for those sending images over their phone, many people still use their email accounts for sharing files.
How to Hack Someone's Cell Phone to Steal Their Pictures
PwnageTool Step by Step. What PwnageTool does is build a custom software bundle to install on your device, which includes all the official iPhone 2.0 software goodness along with the jailbreak.
How To Jailbreak iPhone 4 iOS 4.2.1 With PwnageTool 4.2 On
Despite its shortcomings, the Nintendo Wii U brought about a fun new way to play games that combines a handheld personal screen with your television set. But chances are you've already got a
You Can Now Play iOS Games with a Wii U Controller
Due to time zone differences, customers in New Zealand and Australia will surely receive their iPhone X ahead of the rest of the world. Soon after the first orders arrive there, you'll get your early unboxing videos from enthusiasts and an iPhone X teardown analysis from iFixit. What's the current status of your iPhone X order?
How to Track Your New iPhone 7 Early - Running with Miles
When it comes time to buy a new smartphone, the sheer amount of options on the market can make you feel overwhelmed. There are Android devices of all shapes and sizes with different functionalities and price points, and now, even Apple has three unique iPhone models to fit various budgets.
Having Trouble Picking New Phone This Chart Will Help You
How to make a simple but powerful Pen Gun! *this was not Bic Advertising* You can make this pen gun pretty much anywhere you want in no time ! you can even make one in class when you're at school
How to Make a Simple, But Powerful Pen Gun - Gadget Hacks
Cyanogen, Inc., the for-profit company that spun off from its CyanogenMod roots several years ago, has announced that they're shutting down all of their services. The company's impending demise shouldn't directly impact many Android users, but the announcement does have one major repercussion: The servers that used to host the popular CyanogenMod custom ROM have now been shut down.
How to Install a Custom Recovery on Your Nexus Without Using
How To: Get Windows Phone-Style Notifications on Your Samsung Galaxy S4 How To: Launch and Close Apps Faster on Your Samsung Galaxy S3 and Note 2 How To: Get Quick-Access Pandora Controls in the Notification Tray of Your Galaxy Note 3
The Galaxy S10 Doesn't Have a Notification LED — Here's Why
How to Customize Grouped Notifications in iOS 12 to turn off grouped notifications entirely or to force your iOS device to sort all incoming notifications by app, regardless of whether or not
How to stop annoying notifications on your iPhone - komando.com
How To: This Easy DIY Money Indicator Light Makes Sure You Always Have Cash in Your Wallet How To: What You Should Eat (& Avoid) When You're Hungover & Why News: Niantic Conjures Preview of Harry Potter Augmented Reality Game, Opens Pre-Registration on Google Play
How To: Transform Gift Card Balances into Cash from Any ATM
0 komentar:
Posting Komentar